What are you trying to find???

Friday, December 10, 2010

SEW THIS: Family Stockings

(DON'T FORGET about the Christmas Cookie Exchange! Still need more people to submit recipes, and it will be great!)

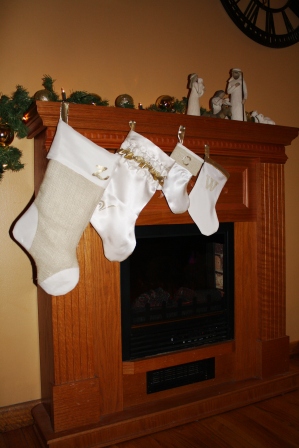
What's that? You were looking at my last post about nativities and noticed that FABULOUS little family of stockings? And you were wondering where I came upon such lovely little gems? And you were hoping if I said I made them there would be a tutorial coming so you could make one just like it?!?!

Well... I am so glad you noticed them! I did, in fact, make them. And, because I love you I threw together a quick Tutorial for the big one... and... have compiled some other resources should you like to try your hand at creating some of your own stockings. :)

I cannot lie. I am so excited about these. This is my favorite project I have done in a LONG time. Can you tell by what a goob i am being in this post?
I knew I wanted to make us some new stockings, but wasn't sure what kind. Soooo... I pulled inspiration from several places and I took some fabrics I had on hand that were neutral/coordinating and went for it. (I know you are laughing because i just called Gold lame neutral. :) haha)
Z's was the first one. I wanted it to look fancy... and Z is always concerned that the stuff I make for him is too fancy, and not very manly. So I used the ivory burlap as his base, lined with muslin, with satin details for the toe, heel, and cuff. I used the wrong side of the satin, which was still pretty... just not as shiny (more manly). I had to add a little sparkle, so the hanging loop and his initial are in gold. Just a LITTLE polish for Z. (He liked the Z because he thinks it's similar to the Z in Zildjian, and he's a drummer, so I guess I did good!)
Mine was next. And I am all girl and ruffles, bows, sparkle and shine. The fancier the better. I used shiny ivory satin, lined with muslin, with satin and gold lame ruffles and a gold hanging loop and initial for me as well. My initial is all scroll-y and pretty... and was a pain in my rear to cut out. (I don't have one of those fancy cutting machines, that is all by hand, baby!) I love the way it turned out though. LOVE it.
Before you get all excited about the little stockings on my mantle... NO I am not pregnant! Though people think that's a cute thing to ask me almost daily. sigh. For the record, I am not amused. Anywho... the little stockings are for the Boys:
I decided not to line them, because it was unnecessary work for a stocking that... well, lets be honest, we have dog stockings, but we don't put much in them. They are just for show. So no lining. Charlie's is in ivory satin with a burlap cuff, and gold initial and hanging loop. Winston's is also in ivory satin, just the wrong side so it's less shiny, and a gold edge and Loop, burlap initial. I cut free hand patterns for each of them, because I wanted them to be just a little bit different shape/size. I think they are cute all hanging on our fireplace.

Okay, so this is not obnoxiously long, I am going to put the tutorial after the jump... (but you really want to click it!)
Soooooo... not that it's too difficult (because i wouldn't have made them if it were!) but here's a quick tutorial on how to make the Burlap one:

We had these ugly red furry things that I used to trace a pattern. If you don't have a stocking to trace look HERE for a free printable pattern. You will need two cut from burlap and two from muslin (or satin, or flannel, or cotton or whatever lining material you have decided to use. If you are using a pattern material, make sure you have opposite right sides). TIP: Allow an extra large seam allowance when sewing burlap, if you don't the stuff frays apart quickly and your resulting shape will be small and mis-shapen. I learned this the hard way, and have a tiny first-attempt burlap stocking in my junk pile to prove it!

Trace the foot of your stocking onto some interfacing. Draw on a curved heel and toe section. Cut the toe and heel portions from your interfacing. (I always use fusible interfacing, if you are doing so, remember you will need opposites (or reverse image of the shapes) for the front and back of the stocking.)
Use your interfacing a a pattern to cut out toe and heel pieces of satin. Iron or baste interfacing to satin.
I also ironed under the top edge for the next step...


Pin the toe and heel to each side of the burlap and top stitch around the top (folded) edge, (The edge where the pins are) Do this also to the other burlap piece, only the two pieces should be mirror/opposite each other.


 Now stack all four layers muslin, burlap, burlap, muslin (your burlap should have right sides together) and sew around outer edge, leaving top open.
Clip the curves for turning right side out.
NOTE: The way I made this leaves unfinished seams on the inside. I did this because I didn't want the bulkiness of the burlap to make things lay funky or to show from the inside (since burlap is see-through-ish) If the unfinished edges bother you, could could always serge/overcast them, or consider using bias tape to make a finished edge. It's not a big deal to me as it is.


For the cuff, I cut a piece of satin long enough to go around the top and twice the width I wanted to final cuff to be. Folded the width in half and ironed it down. Then attached it to the stocking. You will sew around the opening. You want the wrong side of the stocking to the right side of the cuff.
Then turn it right side out, and fold over your cuff.
I appliqued the Z on the front. And hand stitched the loop to the inside of the stocking...


TA-DAH! You are done!

I don't have a tutorial for my ruffle stocking. I got my ideas from Mandipity, HERE and HERE, I was just working off an idea from the pictures i saw there a couple weeks ago, and... just now when I went to link to her pictures, I discovered that she already had a tutorial for each of those stockings. Sooo... there you go. Maybe if you don't find mine helpful, try hers. (How cute is her postmarked stocking, by the way?!?!)
ALSO... here is another tutorial I found just this morning for a stocking... this is closer to the way i made the ruffle stocking, with finished edges on the inside. This one is brought to you by UCreate.

I hope you enjoy hanging your stockings by the fire this season... I hope Santa fills them full of goodies. I hope you enjoy creating for your family and making memories with them this holiday season!

linked to:
Join us Saturdays at tatertotsandjello.com for the weekend wrap up party!

1 comment:

  1. Super cute! I've wanted to make stockings for awhile, but just haven't found exactly what I want to do. Love yours!

    ReplyDelete