
Thursday, May 31, 2012
cupcakes
It's been a little crazy around our house. I have been creating father's day presents, which through trial and error are turning out really cool-- but super time consuming.
And then this morning at 3 am when I was feeding Sam I was going-- dang. It's Mel's b-day and I don't have a good video plan. So I got up at 7 am and started whipping up some fake cupcakes (fake=something I could feed my 5 month old child without him going into a sugar coma.)
Organic applesauce muffins with yogurt 'frosting'. The sprinkles are contraband, but it was a birthday, and I didn't actually think he would dig in like he did. That's what I get for trying to guess what Sam will do next.
Anyway, whipped those babies up and got the video in one take, edited and sent to Auntie Mel...
but my kitchen is a disaster. It doesn't help that the dogs got in the trash today while I was putting sam down for a nap. Sigh.
Hopefully I'll have more completed projects to share soon.
And I hope to have Sam's 5 month post up before he is 6 months old. But no promises. Not when my brain dreams up videos of cupcakes at 3 am.
Monday, May 21, 2012
Bubble

I love you, your sense of wonder and curiosity, and your capacity to learn and take in new things. So glad you liked the fish, buddy.

Sunday, May 20, 2012
Friday, May 18, 2012
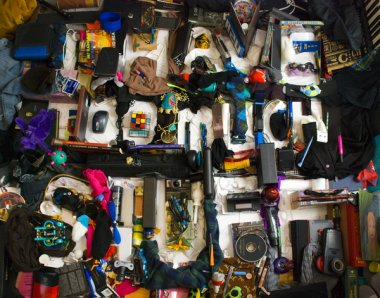
100+

Deadline.
My personal challenge to remove 100 items from my house is up today.
Are you dying to know how I did? are you waiting on the edge or your seat to find out if I made it to 100? I am sure you are... (ha!) But before i talk about results i want to talk a little about the process.
So how was it? Was it hard to part with things?
It was for me at first. Well, honestly when I started the challenge I had in my mind a list of the things i wanted to get rid of, so i felt confident going in. And then I gathered up those things and wrote them down... and I had 12 things. And I have to say, I was a little disappointed it wasn't more. How would I ever make it to 100? What was I going to have to 'give up' that I wanted to keep, simply to make this goal? And I started to get all needy and possessive and selfish about my stuff--
It's silly to get rid of this stuff that has value, or this stuff that I am not using now... but might some day. I need this stuff... I paid for this stuff... I have earned this stuff.
And then somehow, I heard this self talk-- and I was appalled.
That is exactly what got me into this over-stuffed house to begin with. That is the opposite of living simply and content. It is the exact opposite of living gratefully. And I do not wish to be that selfish, ungrateful person telling herself she earned all this. YUCK.
So I started cleaning and sorting and getting rid of things. Some stuff was junk--trash-- that I held onto for sentimental reasons. I carefully logged the memory in my mind, or wrote it down in a journal if it was important, then got rid of the item.
Some things I found in my wardrobe were things I didn't even like or couldn't wear, but I had held onto them for the brand name, the status, the fact that I liked seeing 40 pairs of pretty shoes lined up in my closet even if I only reasonably wear 4 on a regular basis. People don't give a crap what brand name is on the pants that fit you poorly, Valerie. It was time to get rid of those items and those delusions.
Some things, I started cleaning out, and realized how much excess we had. Really. We have 2 beds and 10 sets of sheets in our house. 2 adults and 16 bath towels. Over a hundred pairs of socks between the two of us. That is entirely out of control. And does nothing but encourage me to do laundry less often. Our excess was harboring laziness in our house, and it was time to get rid of it.
This week I cleaned out our linen closet, my spice cabinet, half of my wardrobe (the other part didn't make the deadline), my jewelry box, and several boxes in our storage area downstairs. Do you want to know what items left our house?
1 box full of old magazines
1 large tub of books (there were probably 40 or so there, I didn't count them)
12 DVD's
1 Baby Bullet we aren't going to use
2 cookbooks
1 folder full of recipes I printed off and never tried
6 sheet sets
1 fitted sheet
5 pillow cases
1 comforter set (comforter, bedskirt, shams, and decorative pillows)
8 towels
5 hand towels
10 wash cloths
1 kuerig storage tower
1 grilling basket
1 pizza spatula
1 basement throw rug
1 chipped salad plate
1 folding desk
1 folding chair
1 humidifier
1 melted tupperware bowl
2 plastic tub/boxes I kept jewelry in
1 plastic jewelry pouch
30 pieces of jewelry in good condition
10 pieces of jewelry that were broken beyond repair and thrown out
3 hair accessories
16 clothing items
15 baby clothing items
8 bottle of baby products sam can't use (dang allergies!)
1 baby play gym
1 candle
3 picture frames
4 empty shoe boxes
And 17 bottles that were duplicates/expired in my spice cabinet.
So... did you do the math? That is 173 items removed from my home.
WHEW! I have to say I am exhausted after a busy week of cleaning, sorting, and getting rid of stuff... but oh my word, I feel better.
Really. It's been kind of freeing getting rid of this stuff. And cleaning out all the excess, trash, and uneccessary makes me feel like I have better access to use and enjoy the things still in my house. Also cleaning and getting rid of stuff is kind of addictive. I got started and then it felt so good I just kept going and going. And I am not stopping today just because it is the challenge deadline. Admittedly, I might slow down a bit, but I am going to keep working toward storing and holding onto less stuff.
Becuase at the very beginning of this challenge that's what I said I wanted, right? LESS STUFF. I am happy to report I achieved it, and it feels great.
So how did you do? Did you make your goal? What did you get rid of? How do you feel? Tell us about it all in the comments! :)
Thursday, May 17, 2012
Summertime Salad!
I made this salad for a church potluck a few weeks ago and it met rave reviews! I was pleased that so many people liked it, and so many people asked me for the recipe. This is not a Valerie original recipe... I found it on pinterest, the original source is here. Of course I tweaked it a tiny bit to my liking... so I am reposting her recipe with my changes. (Her food photography is much more beautiful than mine...so you might want to check out the source just for drool-worthy pics of food!) Enjoy!

4 Ears Corn, husk removed, brush with olive oil and grill, remove corn from cob
2 Avocados, diced
juice of 1/2 a lime
2 C. Tomatoes, red and yellow cherry variety (or sometimes I use diced heirlooms... yum)
1 Small red onion, finely diced
¾ C. Feta, crumbled
1 ½ C. English cucumber, skin on and chopped small dice
1 t. finely minced garlic (or rub with salt to make a paste)
2 T. Fresh cilantro, minced
½ t. Salt
10 Grinds of fresh ground pepper
Grilled Corn and Avocado Salad
(with cilantro vinaigrette)

2 Avocados, diced
juice of 1/2 a lime
2 C. Tomatoes, red and yellow cherry variety (or sometimes I use diced heirlooms... yum)
1 Small red onion, finely diced
¾ C. Feta, crumbled
1 ½ C. English cucumber, skin on and chopped small dice
Pour lime juice over avocado and toss to coat (this will prevent browning) Add to a large bowl and refrigerate until ready to use.
Cilantro Vinaigrette
6 T. Olive oil
3 T. Sherry vinegar1 t. finely minced garlic (or rub with salt to make a paste)
2 T. Fresh cilantro, minced
½ t. Salt
10 Grinds of fresh ground pepper
Add all of the above ingredients in a small glass jar with a lid. Shake
really well. Taste and adjust seasoning and ratios of oil and vinegar as
you desire.
When ready to serve salad, add the dressing and gently toss.
Wednesday, May 16, 2012
100 things-- in the middle of it all.
 |
| Reader's Digest, April 1968 |
For me... it was hard at first, but the further into it I get, the easier it becomes.
Yesterday, I cleaned out my jewelry box, and got rid of almost 50 pieces of jewelry! That's not the crazy part though-- after removing 50 pieces my jewelry box is still overflowing. I like jewelry, I do... but obviously I wasn't getting use out of 90% of the jewelry in that box. Sooo... cleaned up and repaired several pieces, threw away a bunch of stuff that was gross or beyond repair... and strangely I feel like I have much more jewelry at my disposal now. Hmmmmm.
I've been thinking this week about that 20/80 rule. You know... how you use only 20% of your stuff 80% of the time? As I am sorting through my STUFF I am thinking about that 80% I am keeping around for that 20% when I might need/use it... and I ask myself, is this valuable enough to store-- taking up prime realestate in my house for a rare occasion I might need it?
And furthermore, who really needs two chocolate fondue fountains? (Yes, I have two of them-- soon to be less!)
So what do you think?
Do you think you will make it to 100 by Friday?
Do you think I will?
Do you think you will miss the stuff you are getting rid of?
Monday, May 14, 2012
Happy Mother's Day

Mama loves you, little man.
Friday, May 11, 2012
100 things

I want less stuff.
Seriously.
The stuff in my house-- in my life-- has reached an out-of-control level. There is too much of it. It is wearing me out and holding me back. It needs to go.
I've been saying this for several months and I haven't done a darn thing about it. It's time for action. It's time to challenge myself to make something happen. Or make 100 things happen. Or make 100 things stop happening in my house. But I'm getting ahead of myself...
This morning I was again lamenting the amount of stuff in my house and my inability to control it, and all of a sudden a number popped in my head. 100. I need to get rid of 100 things.
Not really sure what those 100 things are going to be, but I am beyond certain I have several hundred items in my house that I could do away with and never miss. To 'get rid of' things, I can throw away, give away, donate, or sell the items.
So challenge for me is: Get rid of 100 things by next Friday. One week from today.
I am serious. I warned my husband this was going to happen. I told him to nail down anything important, because I am cleaning this place out. And I am talking about it here, so you can keep me accountable. I will make a list of the 100 things and let you know how it goes.
Would you... consider taking my challenge with me? Maybe you find yourself in the same boat with too much stuff and you are ready to dump 100. Maybe 100 seems like a big number, but you want to dump 30 things. Maybe you aren't ready for that kind of sorting, but you can challenge yourself to get rid of one thing a day. Would you consider challenging yourself as well, then sharing with me your experience?
Maybe you already live simply and minimally and you have great tips, and want to be a cheerleader-- would you consider sharing your story?
Leave a comment and let me know!
See you next week- with LESS STUFF to talk about!
I'm pumped.
Wednesday, May 9, 2012
Keep your bags handy!
This is kind of a ridiculously simple project.
At the very least it is a great big DUH project... DUH, meaning, once I did it I was all, this is such a great solution, DUH! Why didn't I do this sooner???
And why didn't I make one for every room of the house? (Well, because I haven't eaten enough oatmeal. But I am getting ahead of myself...)
Sam has a small trashcan in his room that we use for disposable diapers on the occasions he wears them (mostly when we're out and about, or if he has an extra bad diaper rash and we have to use the heavy duty not-cloth-approved diaper rash cream.) We don't have a diaper genie or one of those things that makes diaper sausages... you know what I'm talking about? Nope none of those. I think they are smelly and unnecessary. We have a small trashcan that gets dumped frequently. Much better for us. Much less smelly. We use plastic grocery and walmart bags as the liner for our can, so we need easy and frequent access to a stash of those in Sam's room. Preferably something that doesn't look like a pile of old plastic bags.
Behold!
The plastic bag holder:
 Exciting, no? I told you-- you are totally thinking: that's a stupid easy solution, why have I not done this?
Here's how the thing come together:
You are going to need:
An empty oatmeal can ( or cofffee, protein powder, etc... something tall and cylindrical with a snap on plastic lid)
About a fat quarter of fabric
spray adhesive
 Start by measuring up your can... get the height and circumference, and cut a rectangle of fabric accordingly. (add 1/2 inch to your width/circumference measurement)
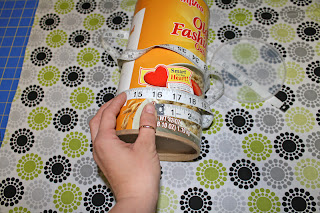 Iron down about 1/4 inch on one end of your fabric so you will have a nice clean seam where the fabric overlaps.
 Protect your work surface (I use paper bags), and spray one side of your can with the spray adhesive. line your fabric up and start smoothing it in place.
 Work your way around the cylindar, a little bit at a time smoothing as you go, until you make it all the way around, and oh look, you have that nice seam that you ironed down, lovely! Trim any edges that hang off. (or you could easily cover uneven edges by hot-gluing on some ribbon or decorative trim.)
 Grab the plastic lid and use and exacto knife and straight edge to cut a star shape in the lid.
 Now fill it full of plastic backs and place it somewhere useful! You can see mine found a hangout right next to the trashcan it will serve. Because the fabric is cute it looks nice in the room, and it's super handy having it there.
 But think about how nice it would be to have one next to the trashcan in the bathroom! The office! Your bedroom! You don't even have to cover them with fabric either, if you are opposed to things of that nature. You could decoupage junk, or scrapbook paper on those things. You could spray paint them. You could put vinyl decals on them. Or you could just leave them as oatmeal cans, if you don't mind that look. It doesn't matter to me... be creative.
 Now go eat some oatmeal... because once you have one, you are going to need several more. Oh, come on, it's not like you don't have the plastic bags to go around.
At the very least it is a great big DUH project... DUH, meaning, once I did it I was all, this is such a great solution, DUH! Why didn't I do this sooner???
And why didn't I make one for every room of the house? (Well, because I haven't eaten enough oatmeal. But I am getting ahead of myself...)
Sam has a small trashcan in his room that we use for disposable diapers on the occasions he wears them (mostly when we're out and about, or if he has an extra bad diaper rash and we have to use the heavy duty not-cloth-approved diaper rash cream.) We don't have a diaper genie or one of those things that makes diaper sausages... you know what I'm talking about? Nope none of those. I think they are smelly and unnecessary. We have a small trashcan that gets dumped frequently. Much better for us. Much less smelly. We use plastic grocery and walmart bags as the liner for our can, so we need easy and frequent access to a stash of those in Sam's room. Preferably something that doesn't look like a pile of old plastic bags.
Behold!
The plastic bag holder:

Here's how the thing come together:
You are going to need:
An empty oatmeal can ( or cofffee, protein powder, etc... something tall and cylindrical with a snap on plastic lid)
About a fat quarter of fabric
spray adhesive


Tuesday, May 8, 2012
Orangey Clean-ness!

I used to just use whatever all purpose cleaner was cheapest at the store... but I started getting wigged out about chemicals around the house when Sam was born. I know I can't completely eliminate my child's contact with foreign and possibly harmful chemicals, but I kinda want to at least reduce what I can in our own home.
I make my own laundry soap and dishwasher soap... why not kitchen cleaner?
I have heard many people say they use diluted vinegar as an all purpose cleaner... and it makes sense. Vinegar's acidity kills mold, bacteria, and other undesirables. It also cuts through scumminess and grease. It's non-toxic, environmentally friendly, and quite economical. And it will leave your house shiny and smelling like...
Like vinegar.
Bleck.
I tried to get past the smell but I couldn't.
Then someone posted this on pinterest:

Ah! Great idea.
It won't smell as vinegar-y and you have the added cleaning power of those lovely citrus oils.
A few days later I just so happened to be at my parent's house for breakfast and my dad had a whole bag of oranges he was juicing. I snatched the peels and took them home with me. I cut them into manageable pieces then shoved as many as I could into three empty jars I had on hand. I filled the empty space in the jars with white vinegar, then put the lids on and set them on top of my fridge.


Safe and effective. And leaves your home smelling clean and...
Orangey.
Which I like.
Happy cleaning!
Thursday, May 3, 2012
Backyard Beautifucation: Part 5 (The Shead!)
So you have seen pictures of our yard-- and pictures of the things we love. Let me show you a picture of something Z doesn't love in our backyard:
 This is the part of the yard that is rarely photographed, and often pushed out of the way when it is. See that dirty plastic tub? Thats where we store our outside pillows, tiki torch fuel, bug candles, some funnels, random garden stuff, and grilling tools. It's kinda a junk drawer... but you know, the outside version. Then behind it are a couple rakes that just lean against the fence, because they have no where else to go. Also, recently our crumbling, needing to be thrown out tiki torches found a home there as well. And it was starting to look cluttered, dirty, and generally unappealing. And Z would comment on it every time we were in the yard.
I know! I would say, But where are we supposed to put that stuff? We don't really have room for it inside.
then the other day Z said... what if we put a cabinet or something up by the house, and we could make it tall enough to put rakes in.
Not a horrible idea... but first you need to see another rarely photographed view of our backyard:
 We do not exactly have a lot of space in which to put a cabinet. So its not like we could just go to The Depot and get one of those pre-fab plastic mini sheds to stick in our yard. (besides, those things are ugly as sin, amIright???)
Function over form Z was all... I could slap some plywood together...
Form over function Valerie was all... We could build a lovely little corner cabinet that would fit in that space and look adorable and we could have a cute little drink station for entertaining and run twinkle lights around it...
And we sat and looked at each other for a few quiet minutes, and then someone suggested, we should draw something so we know what the other person is talking about. So I pulled out the sketch book and we doodled for a while, and came up with some ideas, and when Z was at work that evening, I took some measurements, and drew up some plans. My dad called that evening, and I asked him if he thought we could build a little corner cabinet for our yard. And my Dad-- who is learning not to question my moments of genius inspiration (insert winky face)-- said, Draw a picture of what you want, and I will see if I can make it happen.
So I drew this:
and when Z saw it, he was excited. And when my Dad saw it, he was excited too. He claims he was also toying with the idea of using cedar planks so it would match the fence... So we were all on the same page.
And then my dad, because he's one of those engineer types, took my simple drawing, and put it all into a CAD program and printed us out plans with measurements and angles and full color views from every angle. This thing was happening, and it was going to be over-engineered as well. :)
My dad Has never been known for his spelling and language skills-- he's a great engineer, who needs 'em?-- and when he was labeling the plans for our mini-shed, he spelled: S-H-E-A-D. When Z and I saw it, we thought it was funny, and started calling our project The Shead. My dad didn't like that we were making fun of his spelling-- but we assured him we were not trying to mock him and we found it endearing. We liked having a special name for our project!
Anywho... we headed to the Home Depot to pick up the supplies. This wasn't a cheap project-- but it was done the right way-- with all pressure treated wood so it would not rot out after one season. All our material: wood, screws, glue, and hardware, came to around $150. However, a similar in size and shape plastic shed was $159... so we're not too torn up about the cost.
Enough talk onto the building.
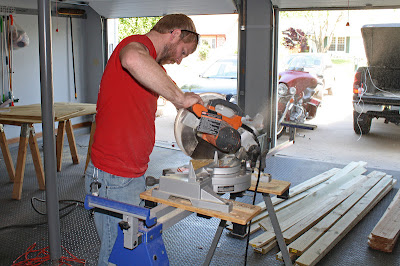 Mmm... my man and power tools... Sexy, no?
Zachary and my dad worked in my parent's garage to build it. And... Sam even helped!
 Okay, so that picture was completely staged. Sam played inside with Grandma most of the day, but he did come out and watch his Daddy assemble the doors... and clutched a pencil for dear life while he did so. Of course Mama forced a photo opp. (Oh, come on! What was I supposed to do?!)
 This is my dad working on the frame. Because it was a small space our cabinet needed to fit into, we decided a corner cabinet would be the best use of space, and the most aesthetically pleasing. But it was still small, so we opted to keep the back of the cabinet open so we wouldn't loose any space (we can shove our stuff all the way up against the brick wall-- no loss of space there!). This also would reduce the cost of material, and lighten the cabinet considerably. That puppy was all kinds of re-inforced and heavy as crap when it was all done.

It was evening by now, and the guys started hanging the doors... when we realized the hardware (hinges) we had purchased were not strong enough to hold up the doors. So sweaty and covered in sawdust we all loaded into the truck and went back to the Depot to get some bigger ones.
When we finally got back, they hung the doors and installed the hardware... and it looked great! But it was around 9:00 when we finished for the evening.
 So we waited until day 2 to install the thing. But before we put it in, there were a few other things that needed to happen. Let me remind you of this-- the before pic looking from the back of the yard toward the house:
 It's kinda hard to see in this picture, but next to the house it's really shady, and difficult to grow grass. On the one side we have that lovely airconditioning unit, and beside/behind that is a mud pit. The other side of the steps (where we were about to put The Shead) was not much better. So Z had the idea to do some landscaping... we put down some edging and mulch around the AC unit to cover those muddy areas, then mirrored that shape on the opposite side of the steps. Hopefully it will make the 'yard' look a little less patchy, and a little more balanced and appealing.
But our mulching and Shead installation kinda ripped out what little grass was hanging on in those corners... so we ended up laying down sod in that half of the yard. And because I am always running around without shoes and my husband and grossed out by all the mud and possible poo I may be tracking through when walking barefoot in the grass, we included a small stepping stone in the middle of the grassy patch in front of the Shead. I was deeply involved in the landscaping/mulching/sodding/stone laying process, so we have no process pictures, just this magical after:

 Hey look! Mulch! Sod! Shead! Probably got there by elves or internet magic or something.
Anywho, here's what The Shead looks like empty... there are shelves on the left to store pillows, candles, tiki torch fuel, garden and grill tools, and other outside stuff. The tall open space on the right holds our rakes, shovel, pooper scooper, and other unsavory items Z wanted to remove from their former leaning-against-the-fence-by-the-grill-position. Here's what The Shead looks like filled:
 And once that the doors are closed and latched that side of the house, and the filled completed Shead looks like...
 AH! Lovely, beautiful, practical Shead... We love you. You look so very handsome in our backyard. I am so pleased!
 And here, you can see the rakes and storage have been hidden from view bringing this side of the yard up to par with the rest of it.
And with the completion of that landscaping project, the building and installation of the Shead-- I declare Backyard Beautification complete! Yay! I could not be happier. with how things turned out.
Wanna see some before and afters? Yeah-- meeeeee too.


I know! I would say, But where are we supposed to put that stuff? We don't really have room for it inside.
then the other day Z said... what if we put a cabinet or something up by the house, and we could make it tall enough to put rakes in.
Not a horrible idea... but first you need to see another rarely photographed view of our backyard:

Function over form Z was all... I could slap some plywood together...
Form over function Valerie was all... We could build a lovely little corner cabinet that would fit in that space and look adorable and we could have a cute little drink station for entertaining and run twinkle lights around it...
And we sat and looked at each other for a few quiet minutes, and then someone suggested, we should draw something so we know what the other person is talking about. So I pulled out the sketch book and we doodled for a while, and came up with some ideas, and when Z was at work that evening, I took some measurements, and drew up some plans. My dad called that evening, and I asked him if he thought we could build a little corner cabinet for our yard. And my Dad-- who is learning not to question my moments of genius inspiration (insert winky face)-- said, Draw a picture of what you want, and I will see if I can make it happen.
So I drew this:
 |
| Please don't make fun of me... drawing and engineering is not really in my skill set. Do you like the nice list I made of things we could put in the cabinet??? |
And then my dad, because he's one of those engineer types, took my simple drawing, and put it all into a CAD program and printed us out plans with measurements and angles and full color views from every angle. This thing was happening, and it was going to be over-engineered as well. :)
My dad Has never been known for his spelling and language skills-- he's a great engineer, who needs 'em?-- and when he was labeling the plans for our mini-shed, he spelled: S-H-E-A-D. When Z and I saw it, we thought it was funny, and started calling our project The Shead. My dad didn't like that we were making fun of his spelling-- but we assured him we were not trying to mock him and we found it endearing. We liked having a special name for our project!
Anywho... we headed to the Home Depot to pick up the supplies. This wasn't a cheap project-- but it was done the right way-- with all pressure treated wood so it would not rot out after one season. All our material: wood, screws, glue, and hardware, came to around $150. However, a similar in size and shape plastic shed was $159... so we're not too torn up about the cost.
Enough talk onto the building.

Zachary and my dad worked in my parent's garage to build it. And... Sam even helped!


It was evening by now, and the guys started hanging the doors... when we realized the hardware (hinges) we had purchased were not strong enough to hold up the doors. So sweaty and covered in sawdust we all loaded into the truck and went back to the Depot to get some bigger ones.
When we finally got back, they hung the doors and installed the hardware... and it looked great! But it was around 9:00 when we finished for the evening.


But our mulching and Shead installation kinda ripped out what little grass was hanging on in those corners... so we ended up laying down sod in that half of the yard. And because I am always running around without shoes and my husband and grossed out by all the mud and possible poo I may be tracking through when walking barefoot in the grass, we included a small stepping stone in the middle of the grassy patch in front of the Shead. I was deeply involved in the landscaping/mulching/sodding/stone laying process, so we have no process pictures, just this magical after:


Anywho, here's what The Shead looks like empty... there are shelves on the left to store pillows, candles, tiki torch fuel, garden and grill tools, and other outside stuff. The tall open space on the right holds our rakes, shovel, pooper scooper, and other unsavory items Z wanted to remove from their former leaning-against-the-fence-by-the-grill-position. Here's what The Shead looks like filled:


And with the completion of that landscaping project, the building and installation of the Shead-- I declare Backyard Beautification complete! Yay! I could not be happier. with how things turned out.
Wanna see some before and afters? Yeah-- meeeeee too.
Before

After
 |
| Grass, Fence, Clothes Line, Herb Garden |
 | ||||
| Lighting |
Before:

After:
 |
| Lighting, Shed, Mulch, Sod, Step Stone |
Before:

After:
 | ||
| Lighting, Shed (storage), Fence, Grass |
I feel like this has been a long journey... but I am glad you followed along with us!
The only thing left to do to our yard is to throw a party to break it in!
Subscribe to:
Posts (Atom)