What are you trying to find???

Showing posts with label applique. Show all posts

Friday, December 10, 2010

SEW THIS: Family Stockings

(DON'T FORGET about the Christmas Cookie Exchange! Still need more people to submit recipes, and it will be great!)

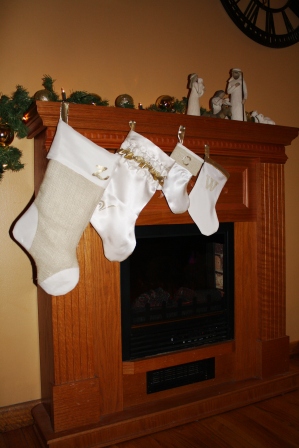
What's that? You were looking at my last post about nativities and noticed that FABULOUS little family of stockings? And you were wondering where I came upon such lovely little gems? And you were hoping if I said I made them there would be a tutorial coming so you could make one just like it?!?!

Well... I am so glad you noticed them! I did, in fact, make them. And, because I love you I threw together a quick Tutorial for the big one... and... have compiled some other resources should you like to try your hand at creating some of your own stockings. :)

I cannot lie. I am so excited about these. This is my favorite project I have done in a LONG time. Can you tell by what a goob i am being in this post?
I knew I wanted to make us some new stockings, but wasn't sure what kind. Soooo... I pulled inspiration from several places and I took some fabrics I had on hand that were neutral/coordinating and went for it. (I know you are laughing because i just called Gold lame neutral. :) haha)
Z's was the first one. I wanted it to look fancy... and Z is always concerned that the stuff I make for him is too fancy, and not very manly. So I used the ivory burlap as his base, lined with muslin, with satin details for the toe, heel, and cuff. I used the wrong side of the satin, which was still pretty... just not as shiny (more manly). I had to add a little sparkle, so the hanging loop and his initial are in gold. Just a LITTLE polish for Z. (He liked the Z because he thinks it's similar to the Z in Zildjian, and he's a drummer, so I guess I did good!)
Mine was next. And I am all girl and ruffles, bows, sparkle and shine. The fancier the better. I used shiny ivory satin, lined with muslin, with satin and gold lame ruffles and a gold hanging loop and initial for me as well. My initial is all scroll-y and pretty... and was a pain in my rear to cut out. (I don't have one of those fancy cutting machines, that is all by hand, baby!) I love the way it turned out though. LOVE it.
Before you get all excited about the little stockings on my mantle... NO I am not pregnant! Though people think that's a cute thing to ask me almost daily. sigh. For the record, I am not amused. Anywho... the little stockings are for the Boys:
I decided not to line them, because it was unnecessary work for a stocking that... well, lets be honest, we have dog stockings, but we don't put much in them. They are just for show. So no lining. Charlie's is in ivory satin with a burlap cuff, and gold initial and hanging loop. Winston's is also in ivory satin, just the wrong side so it's less shiny, and a gold edge and Loop, burlap initial. I cut free hand patterns for each of them, because I wanted them to be just a little bit different shape/size. I think they are cute all hanging on our fireplace.

Okay, so this is not obnoxiously long, I am going to put the tutorial after the jump... (but you really want to click it!)

Tuesday, September 28, 2010

SEW THIS: Puppy Hoodies

Something happened this weekend. Something that has been threatening for many months, but has never come to fruition... until now. This weekend my husband and I were shopping. I picked up an article that struck my fancy... looked at the price tag and said, "20 bucks for this? I could make this for nothing!" That's not the remarkable part of the story, because I have done that very thing about a million times before in my lifetime. The remarkable part is I went home... and I did it. I made it. Actually, I made two. It was a very big moment for me.
Here's how the story starts: When we took the boys for a walk Saturday, their dad mentioned it was getting cooler and soon it would be too cold to walk outside. The boys were horrified at that news. Walking is their absolute most favorite thing in the whole wide world... (although, snuggling with Dad is a close second.)

Ha! I just had to include that picture.
Anyway, we went to PetSmart later to buy dog food, and marched by a rack of doggie sweaters. I am generally against dressing dogs in clothes, but I started to consider because I would love to find a way to extend their walking season... and it gets super cold in the stupid mid-west. Anyway, that thing mention above happened, and there is no way I am paying 20 bucks a piece for my two dogs to have walking sweaters. Soooo... I went home, grabbed a pair of sweatpants out of my trash bin, and went to work. The result was not only successful and functional, but also pretty darn cute... AND did not cost me a thing, as all material came out of my 'trash' pile or scrap pile. I'm not only Dog Mom, I am SUPER DOG MOM. Whoo-hoo.

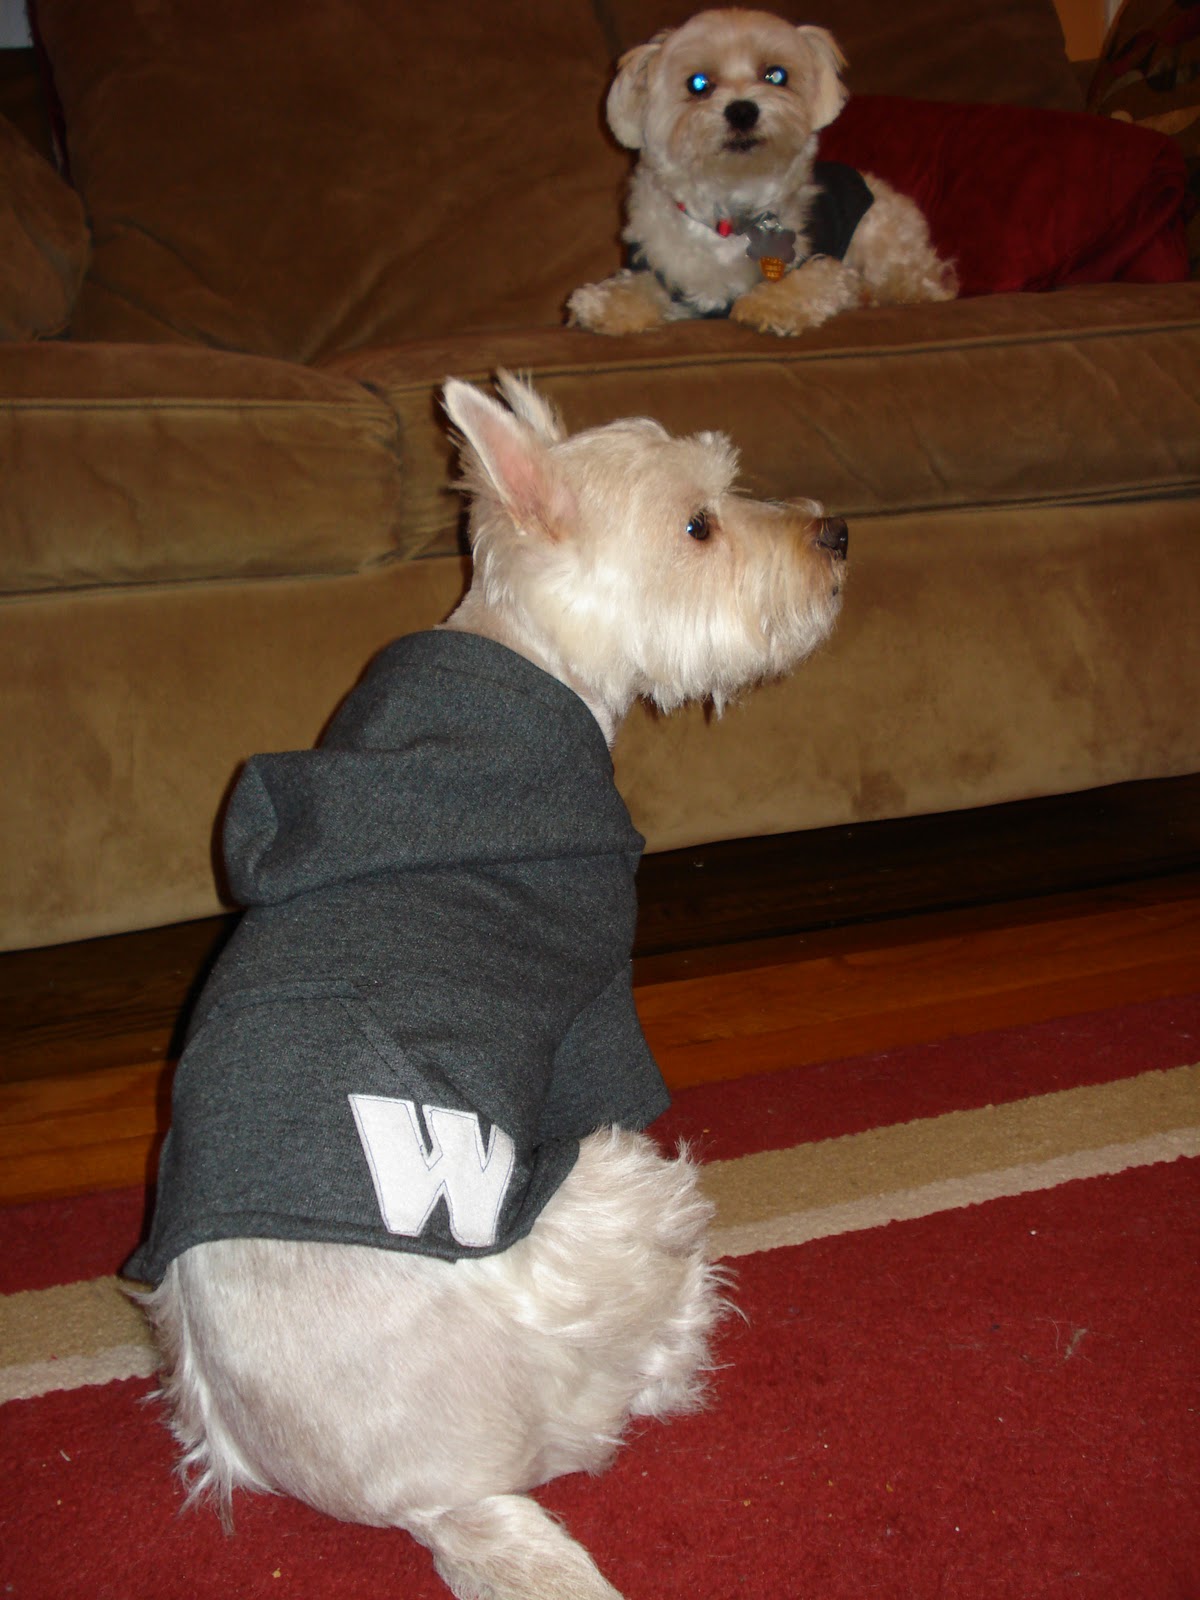
Aren't they cute? I love Winnie's modeling skills here...

Here's a tutorial for the hoodie, as modeled by Winston

Puppy Hoodie

1) I started by pulling a pair of sweatpants and cutting them apart at the seams. Next I measured my Puppy: Around the neck, around the chest (behind the legs), and from base of the neck to the base of the tail.
2) Using your measurements, you will cut out this basic shape. (Yes, you need that part to cut up slightly in the back... especially if you have boy dogs, as you don't want the buggers peeing all over your sweatshirt.)
(My dog's measurements were neck 14 in, chest 20 in -- note how I allowed extra room for seam allowances, and comfort. And... larger around the neck, I didn't want it tight there.)

3) Next cut a rectangle for the hood. The neck should be 2-ish  inches shorter than the neck opening on the body (My rectangle was about 6.5x13), fold in half and round the upper corner closest to the fold.

With right sides together, sew along the top (curved) edge of the hood, clip curve. You can either fold under (hem) the front edge of the hood (opposite the fold) OR do what I did, sew on an extra 1" casing. (Sorry I don't have a good pic of this process. I cut a strip 2"x14" folded in half log ways with wrong sides together. Pinned and sewed with right side of hood to 'right' side of strip, flipped it out and ironed it flat.)
Pin bottom edge of hood to neck opening of body, right sides together, sew together.
(here's the corner/edge of my hood stitched to the neck opening of the body.)
4) Pin right sides together and sew just along the bottom 'chest' part of the body. (stop about 1.5 inches from hood, and at the bottom, where it cuts away:

The un-sewn space between the hood and chest, fold over a small hem, pin and sew down:

5) Next, add the 'sleeves'. My dogs legs measured 3.5" apart across his chest, so I knew I needed the sleeves to start there. Pick a round object approx the size of your dog's leg at the top (I used a roll of tape). Flip the hoodie inside out, lay flat (in half) and pin through both layers. Lay measure half the distance between the legs, then trace your object:

With halves pinned together (you might want to pin specifically around your armhole you have traced) cut through both layers to create your arm hole.

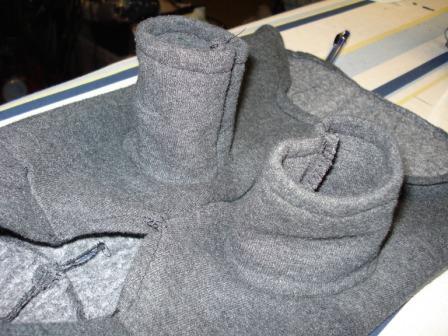
Measure around your round object... Mine was 7 in. Cut two rectangles 4"x7.5". Fold rectangles in half lengthwise with wrong sides together, and overcast along the long side. (I made a seam 1/4" in along the opposite side (fold) just because I thought it would look cooler, you can, you don't have to.)

Fold each in half again, matching the raw edges, pin and sew together.

Now, take the 'tube' you have made and turn the seam to the inside. Insert the sleeve into the arm hole you cut, right sides together.

Pin and sew in place. Repeat for the other sleeve...


6) Now add the pocket... I made a traditional 'hoodie' style pocket, but you could make whatever shape you want. I cut out my shape and ironed and sewed down the pocket openings:

Next I ironed down the three other sides (but not the bottom edge, because that will be part of the hem on the whole sweat shirt.) Center along back bottom of sweatshirt, pin in place and sew down.

7) I wanted to personalize mine... so I added a little felt letter at this point. Used applique technique from here, only I just did a normal stitch with my machine around the outer edge... nice and simple.

8) Turn up a 1/4" hem around the bottom edge (should be the only raw edge you have left...) Going around the curve was a little tricky for me, but the sweatshirt fabric is forgiving...

9) Almost done! One more quick detail: At the center, base if the hood, sew a large 'button hole'. (This will be to slip a leash through)

10) YAY! All done!
(Don't judge me for the messy basement in the background...)
Now find your pooch... and photoshoot!
Charlie's sweatshirt didn't have a hood... and he got a pocket with a C on it.
(I know the dogs look less than happy about this photoshoot... but they do like their sweaters, or didn't seem to mind them when we took them outside in the cool air for a walk. Here they are hacked because it was like, 1:30 and I woke them, to dress them and have a photoshoot. I am a bad mom. It's a good thing I only have dogs... and no kids.) Anyway... the sweatshirts turned out really cute, and even my mom, the REAL seamstress inspected them and said I did a passing job-- especially for having no pattern! Whoo hoo!
I hope this tutorial made sense... or at least enough to give you some ideas of what you can do on your own. I was pretty pleased that these cute new jackets came from trash bin sweatpants... Maybe I have challenged you to rethink a use for something in your trash bin... hmmm...

Friday, August 27, 2010

SEW THIS: Thread bag and Pin Cushion

I have recently started sewing quite a bit. I am kind of a below average sewer... but working to improve my skill. My mother taught me how to sew and until just recently when my husband set up my machine in our basement, I had sewed only on my mothers machine. So when I was sewing in my house... I was a wreck. There were threads and scraps everywhere. I couldn't seem to contain them. They exploded, then quickly organized and were staging a coup to overtake me. I couldn't think of why i was having this problem suddenly that i was sewing in my own house... and then it hit me! My mom has this nifty little thread bag thingy that sit on the edge of her sewing table that all the little threads and scraps magically fall into... nice and neat and clever-- just like my mama! Oh my, I must have one now! I thought to myself and so I got to work.
And as soon as I started my work I figured you would probably want one too, so because I am a good friend I documented... and below is a tutorial. LOVES!
(Oh, and you finally get to see what I did with my monogram applique!)

YOU NEED:
Approx 1/4 yard each of 2 coordinating fabrics
Scraps of Muslin or tightly woven fabric
Fusible adhesive (just scraps...)
velcro
plastic strapping (like the stuff that comes around paper boxes? Actually, you can use a lot of different things, this is to help it hold a round shape. My mom cut out a part of a plastic container, I cut the ring off a small pie plate...)
Sand (i used approx 3-4 cups of play sand)
1" wide grosgrain ribbon in contrasting color
Contrasting thread (same color as ribbon?)
Sewing machine

Step 1: CUT
(I do all my cutting at the beginning of a project, then you are good to go...)
Cut 2 10" by 20" rectangles (one of each fabric, this will be the outer and liner of the bag)
Cut 2 6.5" by 6.5" squares out of 'outer' fabric and muslin (4 squares total)
Cut 2 8" lengths of ribbon
cut 2 4" by 7/8" strips of fusible adhesive

Step 2: SEW PIN CUSHION
Pin muslin together and sew three sides and half of the fourth. Clip corners and turn inside out.
Funnel sand into the pouch you have created. I made a funnel out of scrap paper. (yes, my sand is hot pink. No, no one will see it, but it makes me feel happy inside to know it's there. Your sand does not have to be pink... but it's super fun if it is!) I filled mine as full as possible because I wanted mine nice and chubby. The tighter the sand the better it will hold pins.
Carefully hand stitch closed the open corner of your sand-filled muslin bag and set it aside.


Measure 4" to the center of your ribbon piece and place edge of velcro there, sew in place on the 'right' side of your ribbon. Place your fusible adhesive on one half of your 8" ribbon piece on the 'wrong side' and iron into place. Peel off paper backing and fold ribbon in half back over the adhesive, iron to fuse together (you should now have a 4" length of ribbon with velcro sewn on one side by the fold... make sense? Do the same thing to your other piece of ribbon.
Pin together right sides of 'outer' fabric. Include the ribbons on the 'bottom' edge of the outer fabric, pin them each 1" from center, edges aligned with the edge of the fabric. (the velcro part should be touching the right side of the 'back' piece. Sew sides and bottom. Clip corners and turn right side out. Wiggle the sand filled pouch down into the outer pouch... it should be a nice snug fit. Slip stitch the top closed.
(I used ... this monogram  piece for this... turned out cute. You don't have to have a monogram, my mother has survived about 40 years sewing with a non-monogrammed pin cushion... so i know it's possible, even if it's not as fun.)


Step 3: THREAD BAG
On your 'liner' fabric sew down 2 pieces of velcro. (each one 1" from center of the 10" side of the fabric so they will line up with the ribbon straps...)                                         Fold liner fabric in half (to form 10" square) and pin right side together. Sew just the two sides adjacent to the fold, press seams open. To make a boxed corner, pull bag apart a bit to to make a point. Measure 2" from the corner, and sew a seam across. Trim off corner. Repeat for other side of bag. Leaving right sides together still, press over 1/4" hem, then another 3/4"-- this will become a casing later.
Repeat same steps with 'outer' fabric, only when you get to the last step (pressing) you only need to turn down a 1/4" hem, turn right side out.
You should have 2 'bags' with boxed corners, liner still inside out, outer bag right side out. With wrong side together, wiggle the liner bag into the outer bag, pinch and pin corners to make sure it gets all the way in there. There should be a 3/4" portion of the liner that folds of the top of the outer bag, fold that up for now. Pin in place and sew along the top of the outre bag to secure it to the liner. Flip the 'overlap' hem from the liner back over the top, and top stitch from one side seam around, leaving a 2" opening on one side. Feed the plastic strapping through the casing this creates, and hand stitch the opening closed. (I used the top of a pie plate i cut off and bent up, but it was still tooooo dangerous, so I had to pull it out and wrap it in electrical tape. I recommend... the plastic strapping, much easier and safer!)
 You should have a nice lined bag with boxed corners, and a casing holding a nice round open circle at the top, and velcro on the top/inside of the bag. Did you get there with me??? Did you?

Step 4: ATTACH AND ADMIRE

How happy is your sewing table right now??? :)


Monday, August 16, 2010

SEW THIS: Monogram Applique

So this is a quicky tutorial and a sneak peak at my next project I am going to post... Oooooh...
So I have been wanting to figure out the who applique thing for a while. I am big into monograms... especially for baby gifts and the like I think it's super cute, and what a lovely personal addition! So this was my first attempt... and it worked out pretty well.

You need:
2 coordinating fabrics and thread in a contrasting color
fusible adhesive
artwork/monogram

1. So because this was my very first time... I chose a nice easy letter, which also happens to be the first letter of my name: V. Found a nice looking font on word, and printed it out the size that I wanted. Then... there is this little trick i learned in grade school for tracing... turn your image over and scribble a nice think line all around the border of the image you want to replicate. Then flip your paper over on top of the paper you will transfer it to (in thes case, the paper backing on the fusible adhesive) and then trace the outline of the object on the right side... VIOLA! it shows up. (Note: I learned by trial, not careful planning, that if you are using this method to create a letter or an object that needs to face a specific direction, make a mirror image... otherwise it will be all backwards!)
I had to re-do this one as a mirror image... because when I am done the 'paper' side will be the back side.


2. Iron the fusible adhesive to the wrong side of your fabric, and once attached, cute around your shape with the paper backing still on.  Next peel the paper off the back, place it in the correct location on your 'backing' fabric, and iron into place. 

3. Thread your machine (AND BOBBIN!) with the same color thread and move your settings to the smaller closest zig-zag you can do... mine was actually on the button hole setting. Stitch slowly around the side of you shape... and then iron it nice and flat when you are done...


HOORAY! How cute is that? I know, it's a little rough around the corners there at the top... but it was my first try. :)
So how excited are you to use appliques to make personalized gifts, clothing, or.... maybe if you come back later I will show you what I did with mine (and we can answer my husband's question: Why is there 14 lbs of hot pink play sand in my basement?!)