What are you trying to find???

Showing posts with label gifts. Show all posts

Tuesday, May 7, 2013

DIY Mother's Day Mugs

(I know, 3 posts in a weeks time, I'm a crazy woman!)

Soooo... are you all ready for Mother's Day? Or are you (like me) still running around getting things together? Well, here is ONE MORE gift that doesn't suck that you can definitely throw together at the last minute. Get to it. You've got 4.5 days.
(Side note: Sam's Grandmas, would you kindly avert your eyes until after the 12th? Thanksamillion)


I needed a gift for Sam to give to his Grandmas. This one includes baby finger prints... but really could be anything you want it to. Take this idea, personalize it, spin it however you want.
Both of the Grandmas are tea fanatics. Hot or cold-- but mostly hot. They always are toting around their mugs or hot tea sipping away. So I thought a personalized mug to sip their tea out of would be fantastic. I did a little searching on pinterest for some help. I found this handprint mug, and I said YES! and I found this wine glass which made me laugh, and I thought well, you can sip wine, you can sip tea-- whatever your vice is, I think it works.

I happened to have a couple white ceramic mugs laying around because we recently got some new dishes, and each place setting came with a mug. Even though we wanted place settings for 12 I didn't feel like I would ever need mugs for 12... so we kept about half of them, and put the other half in storage. But when I thought of this project, I went ooh free!!!
If you don't have plain ceramic mugs laying around... you can get these at the dollar store very inexpensively.
The only other thing you need is enamel paint. I used FolkArt Enamel in Burnt Umber and Foliage, purchased at craft supply store for about $2 each.
 
I started trying to free-hand my lettering with a tiny paintbrush... and I just don't have a steady enough hand. So I wiped that attempt off and went for plan B: a stencil. I got out my silhouette machine and quickly make a vinyl stencil for my letters. the stencil is a leeeeeetle finicky to  get it to lay correctly on a curved surface, but I fiddled with it a little and got it good enough.
Then I just dabbed my paint over the stencil-- waited about a minute for it to dray a smidge, then dabbed on a second coat. I peeled the stencil off while it was still wet... there were a few places where it had bled a bit, but that cleaned up fairly easily with a cotton swab, or if it has already dried too much, you can use an exacto knife to carefully scrape away the unwanted paint.
You can see my lettering is not perfect, but I felt like it looked good enough. Again, if you have a steady hand and good penmenship, you could free hand the lettering and it would likely be much much faster. I waited for the lettering to completely dry before adding the baby handprints on the side. It took my husband and I wrangling the toddler to make the handprint happen, and even still it was chaos, and somehow the dog ended up covered in paint-- so i don't have pics of that part. But... grab a small hand, paint on a thin coat of paint, press straight down and pull straight up, and wait for your hand print to dry. Try to block out the screams of childhood trauma from your *willing assistant. (*and by 'willing', I mean a toddler horrified that his hand is dirty and he is being held down, and hates craft time with mommy even more than he hates naptime.) Oh, I also freehanded the little heart on the 'tea bag'.
To cure the enamel paint (make it permanant) the bottle says you can let it air dry for 21 days (um, right, because you planned ahead and have 21 days to sit on this project) OR you can let it air dry for 1 hour, bake it for 30 minutes and let it cool. Um, I'll take door number 2 please. So here are my mugs sitting in the oven (please don't judge my dirty gross oven). As per the instructions, I placed them in a cold oven, turned it on to 350 degrees, once it had heated I set my timer for 30 mins, and when it went off, I turned the oven off to let them cool. I came back a couple hours later and everything was cooled and looked great!
 And there you have it! These will be stuffed with some tea, tied with a ribbon, and should be in the mail today on the way to Sam's Grandmas for Mother's day. I hope they love them, I think they turned out cute.
This was another pretty inexpensive gift-- you know me, gifting on the cheap! I only paid about $5 for the paint. If you didn't have mugs, you might be in the project more like $8-10, but still that's only $4 or $5 dollars for a nice personal mug, with leftover supplies (paint) for more projects.

So that's it! I hope you have been inspired to make something handmade for your mama or grandmother, or any special women in your life this mother's day! If you didn't see my other gift ideas (with tutorials!) check them out here and here.

Monday, May 6, 2013

DIY Garden stepping stone

Today I have what I think is another great Mother's day gift idea, especially for those of you who have little ones. I am desperate to preserve the tiny little feet and hands-- already he is getting so big and those little pink baby toes are walking big-boy dirty toes and I can hardly bear it!
I made these for the grandmas last year (so excuse the date...) but I think they really loved them, and they are a sweet sentimental gift for the gardener or outdoorsy ladies in your life. (Because outdoorsy to me means sipping lemonade on patios, or my parent's golf course quality green lawn in the backyard.)
(See? Golf course beautiful)

Anyway, this was pretty simple to create, but here's a step by step because I love you:
You are going to need:
some concrete (I bought a bucket of QuickCrete at Homedepot for $7),
Plastic plant water drip trays (98 cents at home depot) (or you could probably use old pie tins)
Concrete Letter Stamps (I got these from amazon, but you could also look at craft stores or home depot, especially this time of year, for around $10 or less)
Mosaic tiles (or this sheet of bathroom mosaic, purchased at home depot for about $5)
Spoon or stir stick, bucket to mix stuff in, plastic sheeting and towels to protect your surface and clean up.

This is one of those projects where you will want to have everything ready to go before you start... because once that concrete gets wet, it goes fast!
Start by mixing your concrete per the instructions on the package. It may mix it a little thick, I actually added a little more water so it way smooth and spreadable... like creamy peanut butter. (Adding more water will increase your drying time, just FYI)
Next, scoop your concrete into your mold. I used 2 sizes of trays, an 8" and a 10". The 8" was perfect for a baby size foot... but any bigger you will want a bigger size (they sell 10" and 12" trays as well if you are doing an older child). Smooth the concrete out as best you can, and tap it a few times so it is nice and flat accross the top.
(See how there is kinda some water pooling around the edges there? Thats what happens if you add tooooooo much water. But never fear, it's fixable. After you have scooped, smoothed and tapped, take a paper towel and gently lay it accross the top of the concrete. It should suck the excess right up. Don't press or pat or wipe... just let it do it's thing and carefully peel it off the top)
Next press in your tiles. Work quickly-- give em' a good shove down into the concrete though so it will really grab on, if you just gently place them, they won't stick well. If the concrete is smeary on the tiles, it's okay, it will wipe off with water later. These little square tiles were easiest for me to work with... but if you have actual mosiac tile, or broken pottery, or those little flat marble things, or left over tile pieces from another project... all those would be great. Get creative, rock what ya got.
Now it's footprint time... grab your willing and cooperative 1 year old (riiiiiiiiiight) and squish those tootsies straight down in the middle of the wet concrete mold. (full disclosure: the print pictured above was attempt #32-- or something close to that number. If the first one--or first 31-- doesn't look like you want it, scrape, spread, smooth over the area and try again. Easy peasy.) If the concrete is getting too solid, try dribbling a little water over the top and carefully scraping, spreading and smoothing unitl it's a workable consitancy. Even still, try to work fast, it's only forgiving for the first 10 minutes or so.
Have yourstamps  ready. I chose to put my son's name and the year. But you could certainly put an I love you, or an inspirational quote, or whatever you like.
I started at the middle of my word to make sure it was centered, and pretty straight forward here with the stamps-- press them in, pull straight up and out. If there are lines from the edges of the stamps, smooth them out with your finger.
And there you have it! Now you just need to set it somewhere it can sit undisturbed for 48 hours. It will feel/look dry after about an hour, but you need to leave it alone for 48 so it completely dries and cures.
Still drying here, this is after like, 12 hours. The finish of the concrete looks a little wonky at this point, but it evened out. After everything is all dry, they should pop easily out of the plastic molds, and it's really for your garden:
Or your Golf course lawn:
These turned out to be great gifts for the grandmas, they loved them! I made one for myself as well... and someday if I have a backyard, or a garden, or a small spattering of grassiness to call my own (fingers crossed!!!) it's so going down there! Cute little baby Sam foot. It just makes me smile.
This project is a simdge more expensive than the last I showed you, because you will likely have to purchase most of the supplies. It's not hard to come by-- just not stuff you might have on hand. You could be in it $25 for supplies, but that was enough to make 4 stepping stones, which brings the price per stone to $6.25 which ain't to shabby for a personal and handmade gift that grandmas and mama alike will love... and it's better than a macaroni necklace. Right?
I hope some of you whip some of these stones up for Mother's Day this year, you still have time! And of course if you do... let me know about it, and/or share photos in the flickr pool. Thanks!


Wednesday, May 1, 2013

Recipe Keepsakes

Here's a project a created a few months ago for my dad... but I think it's a lovely and totally charming keepsake that would make a great Mother's Day gift (you have 12 days, by the way...) so I am sharing it with you now.
I actually started this back in December, because it was meant to be a Christmas present, but didn't quite happen.
I think every family has a few recipes that are unique to them... or unique to a certian person in their family. My Dad makes famous cinnamon rolls and a killer apple pie. No one can do it quite like him-- his recipe is unique and delicious and just... his. Same thing with my Grandma's cream puffs. No one made cream puffs like grandma. It was one of her specials. I got thinking about these special recipes and how I would love to make some recipe art for my kitchen, and how much my parents would love having some keepsake recipe art in their kitchen.
I did a little searching and drew some inspiration from HERE (which if you weren't set on creating your own, I would totally recommend, because the work in this shop is adorable), and HERE and set out to create my own. 
I created this using Adobe Photoshop Elements, and using the help of the following tutorials from How to Nest for Less, Sweet C's Designs, and Nest of Posies. If you don't have photoshop, here is a great tutorial about how to create printables using a free site like Picmonkey, it's from I am Momma, Hear me Roar.
After creating my recipe printable (which took a lot of time, trial and error, and tweaking. Self-taught/blog taught graphic artist here!) I looked into buying some nice frames to gift them... but frames are stupid expensive, and still didn't create exactly the look I wanted. So I decided I wanted to mount mine on wood for a little different style.
Here's how that went down:
I took my files to FedEx Office and had them make some nice color prints for me. This cost less than a dollar. (you might also notice that I changed my chalkboard to green... it matched the decor in my parent's kitchen a little better that way)
I went to Home Depot and had two boards cut to 8x10". Then I brought them home and sanded all the edges really well, and stained them with some stain I already had on hand. I also picked up some picture hangers while I was there. Cost for the boards, cuts, and picture hanging hardware was around $5. These were stained several days before... and had completely dried and cured by the time I was working with them. (You notice I didn't entirely stain that top side? It's going to be covered, doesn't matter.)
Next I trimmed the paper prints down to size, I wanted just a very small border of the wood showing around the edges. I laid it on top to make sure it fit and I was happy... I'm happy! Lets move on...
I used a paint brush to put a very very thin layer of Mod Podge (which I already had on hand) on the board, then centered the best I could, starting at the top, applied my paper as smoothly as possible.
I worked in small sections, but very quickly and carefully, as the stuff dries pretty fast and you really only get one shot to get it right. That makes it sound super complicated-- it's not. Just be careful.
Once it is carefully centered and in place with all the mod podge underneath... use a credit card (or your HyVee fuel saver card!) to carefully carefully smooth out bumps, bubbles, and wrinkles.
Once everything is all smoothed out and adheared, get out your modpodge and brush once more and put a thin coat accross the entire top of the board. Mod podge will dry clear, so don't stress if it obscures your artwork while it's still wet. Also, it will give a bit of texture to the art, so make sure your brush strokes all go the same way, and that you don't have finger prints or something in the mod podge... unless thats the look you are going for, I guess.
I will appear to be dry within like 15 minutes... but resist the urge to touch it for a few hours. Let it sit overnight undisturbed to fully cure and harden up.
The next day, install the picture frame hanger hardware stuff to the back (didn't take a pic of this part... sorry!) And you are all done! Yay!

You have lovely keepsake recipe plaques to display in your kitchen or give to someone you love-- or even to remember someone you love. I thought they were really lovely, unique, sentimental kind of art. This project cost me around $6 to create-- which is a pretty cheap gift, I think, but still packs a sentimental punch. If you didn't have things like the stain and mod podge on hand, you might be invested more like $15, but even still-- not bad for nice artwork gift.
I loved them on my kitchen shelf next to Grandma's teapot, and I love them hanging as a pair in my parent's kitchen. My parents were delighted with the gift and proudly hung them immediately.
Maybe you have some family recipes you'd love to create a keepsake out of? Maybe thie would be the perfect gift for your Mother or Grandma this mother's day? Or maybe you just came here to steal the prominately displayed secret apple pie recipe of my father's? Well, I cannot blame you if you did, it's icredible. I can only caution you now that you have this powerful secret to use your powers for good, my friend, not evil.

Wednesday, February 22, 2012

Alpha-bean-bags

One of our favorite little guys turned 3 this week. Happy Birthday!
I wanted to make him something fun for his birthday, but I am all about educational toys. I knew I wanted to do something with the alphabet.... and I debated magnets? blocks? But then I thought about bean bags, and it seemed like the perfect idea.
So I made 26 bean bags in  4 different colors. Each one had the uppercase letter on one side and the lowercase on the opposite side. They were pretty simple and turned out really cute. Here's how it's done:
I started by cutting a sheet of fusible webbing to 8.5x11 size so I could run it through my printer. I printed a reverse image of all the letters on  the paper side and then ironed it to a piece of white felt.
I then cut out each of the letters (I thought this would be an excruciatingly long process. But it only took me about 20 mins to cut them all out.) I used a swiveling exacto knife and a cutting mat for the centers of letters.
 I purchased  quarter yard of each of four colors. I cut squares that were 4.5x4.5" using my rotary cutter and quilting ruler. I cut 52 blocks and had just a small amount left over of each color, so I feel like I bought the perfect amount of fabric! (I never measure or plan before I buy, so I am glad it worked out for me this time!)
Next I peeled off the paper backing still on the letters, then ironed them down. Each bag had the uppercase on one side and lower case on the other.
I did a quick iron on the front (letter) side, but flipped it over to the back and ironed that side very well. I purchased the ultra-hold iron-on fusible webbing stuff. I had considered stitching every letter down as well, like you would do for an applique, but decided that would be way more work than nap time would allow me. So I bought the ultra hold stuff and ironed it really well, and it seemed to hold firm.
Put the right sides (letter sides) together (make sure your letters are going the same direction up and down) then I serged three sides of each block.
While they were still wrong side out, I went ahead and ironed down 1/4 inch along the top to make that easier on myself. Then I trimmed strings and corners and turned each pouch right side out.
I actually filled my 'bean bags' with split peas. I liked the size and they were on sale. Use whatever you have available or whatever is cheapest-- beans, lentils, peas, rice, or even beads if you have an over abundance on hand. I put approximately 1/4 cup of peas in each bag.
Last step! Pin the top and sew accross. Make sure to back-stitch and lock those threads well so they don't come open and spill the beans. heh heh.
One other thing about the bean bags... I selected the colors randomly, except for the vowels. All the vowels (A, E, I, O, U and Y) are yellow. I thought that might be a helpful trick when playing with the bean bags and (hopefully) learning about the alphabet. But I had 4 colors and those 6 bags just so happened to be approx 1/4 of the alphabet so the colors still look balanced.
I bought a cheap red bucket at The Lob to put them in... and that was that! This whole project was completed about 10 minutes at a time over the course of two weeks. It might take you a couple hours if you sat down and did it all at once, but it was quite manageable divided up.
My husband of course usually thinks I'm crazy when I start a project (he rarely understands my 'vision') and this one was no exception-- you are making what? Why would you do that? But once the bean bags were all assembled he came down and picked one up. Cool! Bean bags! Kids love bean bags. Then he held it and tossed it in his hand a few minutes and smiled. Apparently, Zachs love bean bags too.
Little D seemed to enjoy his gift on his birthday-- although he was convinced the bean bags were bags of candy and kept trying to get them open. Oops. I hope he has fun playing with them!

Now... I have a 1st birthday to attend in a few weeks. Any suggestions on a good gift for a 1 yr old???

Wednesday, August 31, 2011

Handmade Baby Love

The room is coming along. But there are delays along the way... (like the basement flooding?!?) keeping me from completeing projects within the time frame I plan on. Sigh.
Currently mid-project are the curtains, but becuase of the basement situation, I can get to my sewing machine right now, as there is a matress on top of it. Whoa. Not good.
In other news the Husband and I just celebrated our 28 and 26 birthdays (respectively) and you'll never ever believe what I got for my b-day!!!
Isn't she lovely? And she makes just the prettiest seams and I feel all professional and a little bit invincible! This should speed along some of those baby projects... no?

Anyway... in the mean time I have been putting around ETSY becuase it is addictive and fun... and found lots of fun handmade baby stuff that my child just might need... Wanna see?
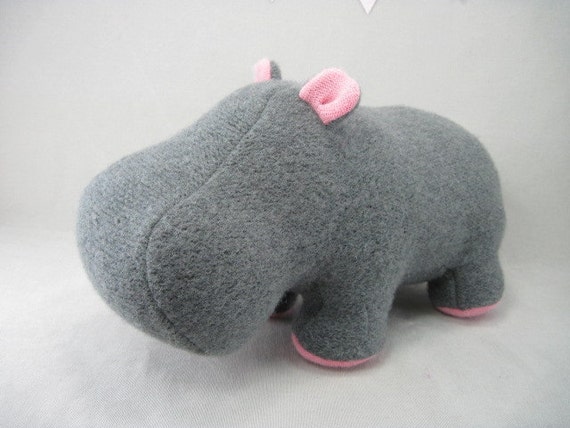
Lets start with this little dude... cute no? And Mama P loves that is is wool (remember my natural fibers love and how we especially love the naturally anti-microbial properties of wool?)
WOOL HIPPO
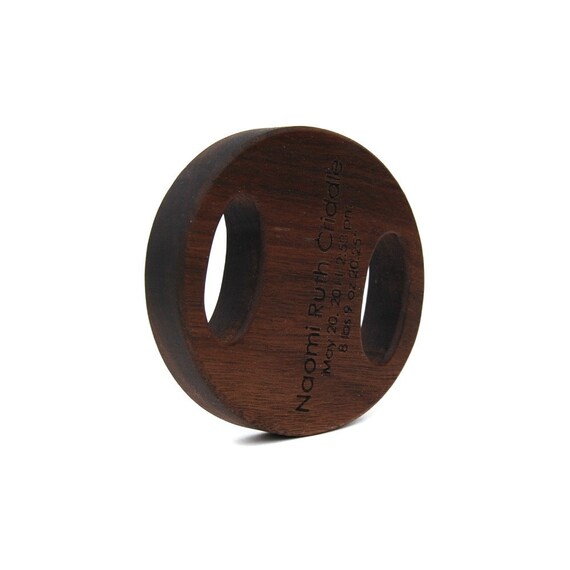
And I love this handmade wooden rattle... you can have it personalised with a name phrase or whatever you want. I love the dark walnut: (they have lots of other way cool wooden teethers and toys in their shop as well... you should definitely check it out.)
WOODEN RATTLE
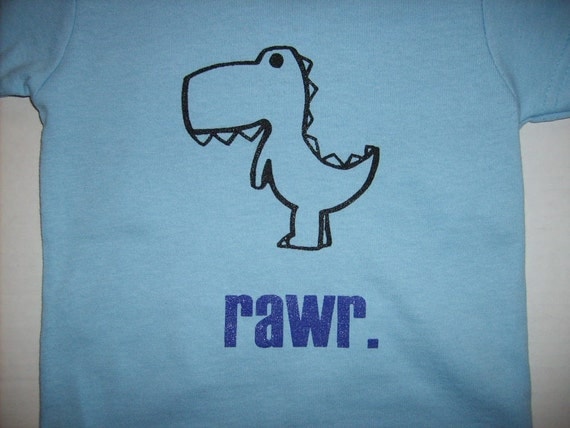
 I think this dinosaur graphic is precious:

DINO TEE
 Hopefully you won't be too scandalized by this next item, but I'm having a boy. I hear these can be handy... and I especially enjoy the 'green' print:
TINKLE TENTS
And while we are admiring green things... I am pretty taken with this mobile. It looks light and fluttery, but would be a stunning addition to my nursery, no?
RUSTLING LEAVES MOBILE
Have you ever found yourself lost on etsy creating a wishlist of wonderful things for your loved ones (or... ahem, yourself?). I kinda love it. Tell me what you found...
And I will keep working away at my own handmade baby projects and have something to share with you soon!

Wednesday, July 13, 2011

Off to Korea

I made this hat over a month ago. Our friends M&E are having a baby girl in just a few short months... and we could not be more excited for them. We cannot wait to meet their precious little girl...
but wait we must. She will be born in Korea, where our friends are currently living, and since our budget doesn't have a 'friendly visit to Korea' overflow... we will have to wait until their sweet little family returns to the states to meet her. When that will be-- no one knows for sure.
I had great plans. I was making her this fun hat. I also had some lovely fabric picked out and had a little dress and some fancy burp cloths in the works... and then I got pregnant and spent my evenings puking, not sewing... and the best laid plans... well... it just didn't happen.
I DID finish one of the projects for her though, and so it will very soon be on it's way to Korea... but i had to show you my handywork first!
This is the first thing I have ever crocheted that was not a scarf, blanket, or otherwise similarly rectangularly shaped. I used this pattern from Aesthetic Nest, and though it is not perfection... I think it is cute. I really like the soft snuggly looking cotton and the peachy pink color. I added a pom-pom to the middle of the flower from the pattern... just to add more texture and color.
I think it turned out sweet, and I hope M&E and their little baby girl love it... and know that it comes with lots and lots of love from Kansas... all the way on the other side of the world! :)