What are you trying to find???

Showing posts with label landscaping. Show all posts

Thursday, September 5, 2013

Fencey McFencerson

Let me put a disclaimer, these next couple posts are going to feel a little incomplete... we were working on quite a few projects that I want to talk about separately, but they were all going on at the same time. So I am going to delay some finished product photos til the end... and also being very involved in all of this stuff myself, I don't have a whole lot of process pictures or tutorials for you (I was busy workin' kid!) so the next few posts might leave you hangin' just a bit. But you'll see it all come together in the end, and it will be worth it. Yay.
There is a lot going on outside our window these days!

So we are putting in a fence.
I know fences aren't for everyone, but we wanted/needed one for a couple of reasons:
    While we have a nice size lot, we are still in a residential area/neighborhood. Our lot backs up to someone else's back yard, we have a neighbor's yard on one side and empty lots on the other, which will eventually have construction. We wanted a little bit of privacy from all that closeness. We like having neighbors, we like our neighbors... we just... needed a bit of back yard privacy.
    We have a dog and kiddos* (*will have plural kiddos in december, and don't know if we will be done with two... who knows???) and wanted a safe contained area for them to play unrestricted. Also we have utility boxes in the back corner of our lot, and didn't really want kiddos playing in that area.
So us, a fence `was the right choice. However, it's not only functional, but we just happen to think a nice cedar fence looks really pretty and raises your property value... and we needed to put in a yard, and so first, we needed to put in the fence.

Before you build a fence there are plenty of paperwork things you have to deal with-- drawing out plans, taking them to the city, getting a building permit, getting utilities marked, etc. Those are important code and safety issues, if you are DIYing your fence, make sure you do all your city requires first. You don't want any surprises or accidents later.

The project started by ripping out the neighbors fence. It was a 4 ft fence that was a little rickety and gross looking. We talked to our neighbor before starting, and actually ended up replacing not just the shared portion of the fence, but his entire fence as well. (He paid the boys for it... so it was a profit that we set aside for another project). They knocked out the panels and pulled the posts, and then we freecycled the fence parts... and it actually was claimed by some friends of our about a block away. Reuse, recycle, and giggle everytime you drive by and see that old fence on someone else's property, guys!

After getting that knocked over they rented a hole digger and started carefully digging around the perimeter. I say carefully because there were quite a few utility lines they were working around.

Oh, there are the utility boxes we were boxing out... heh
Once they had the holes dug, they started putting posts and the frame in place. Carefully, slowly pieceing it together, leveling, digging, leveling again... until it was all setting just so... and then they concreted the posts in and nailed the 2x4 frame to it. For the frame they used pressure treated posts and 2x4s.
Everyone say Hi to my dad!
My Brother in law and our friend James working hard!
Once the frame was solid, the boys got to work putting up the slats. These are cedar slats. They look pretty and smell awesome while you work-- just a nice bonus there. We decided to use a nail gun instead of screws for two reasons, cost and time! Even the the best way would probably be to screw every last slat on, the fencing screws do not come cheap. For the amount we needed, it was going to run us about $400. For screws. Crazy. The nails in the air pressure gun, however were about $50, and we were able to borrow the gun from a friend, and... boy is it fast! Pop! Pop! Pop! Pop! in each post and you are done, as opposed to four screws, even with a power drill we'd have been there for days.
So the boys threw up the slats... okay not so much threw as carefully placed and leveled, while my dad started assembling gates.
They worked from early early that morning, until late that night. You can see that it's getting dark in these pics... but my boys are hardcore, they were going to get it done!
Hey look, they are still smiling! Actually I think they are smiling because this is the last board in my husbands hands... and look what they let me do!
The golden spike! I got to nail in the very last board in the back corner that hooked the two sides of the fence together! Woot!
And... here's that part that I warned you about at the beginning. I'm going to leave you hanging. There were several projects going on at the same time here, and so I don't have a finished project pic of anything without giving away everything, and thats no fun. But we finished the fence that weekend... and it is really beautiful and there are more beautiful things to come! Are you excited? I'm excited.
Okay.


Wednesday, August 21, 2013

The Yard to Be and the Foxen

So we bought a house. And we moved. And since then we've been busy busy busy trying to make the house look presentable. I mean, the house is lovely, and we moved in and unpacked quickly and actually the inside is nothing to complain about. But the outside could use some... curb appeal?

This is what she looked like the day we bought her... not... awful. But not much of a yard to speak of. A crazy, lumpy, uneven, gravel-y lot full of weeds and chiggers! Oh the chiggers are bad.
See that gorgeous lush lawn? Try not to be jealous.
Even though it was 90% weeds and chiggers, we knew it would be a few weeks (or months) before we could get some real grass in this place, and in the mean time, we couldn't be overrun. Plus we also have a puppy we had to let out to go potty, who is terrified of anything teller than a cricket. (Scratch that-- he's scared of crickets too...) but the tall scary weeds were not doing it for him, and we were not really fans of him pottying in the house, duh.  So Z diligently mowed down the weeds twice a week.
We knew we had plenty of work ahead of us, but on top of our weed infestation and our chigger infestation, we also had these guys that liked to hang out in our yard...
Those are one, two, three little foxes that liked to play in our backyard every morning. Which would maybe be acceptable or expected if our house backed up to some woods, or acreage, but our lot backs up to someone else's fence? And there is an empty lot next door. However our house has been empty for 5 years, and these guys made it clear that this lot was THEIRS.
We actually found them quite entertaining and delightful at first. Every morning about 7:00 am they would be out frolicking, jumping, running, and playing in our yard. Right outside out windows, just a few feet from our back door! Sam especially enjoyed watching them in the mornings. But then I started to get a little nervous, becuase they didn't seem to be willing to give up their space. And when we saw this:
The little dudes jumping over a full size fence! I started to get nervous. I didn't know if they would ever act maliciously or territorially if we or our kiddo or our dog was outside, likely they would probably run and hide, but I wasn't sure. I didn't want to risk it. Especially knowing they could hop fences, I was a little concerned.
So I started researching wildlife rescue organizations around us to see if they could be relocated to a safer location for everyone. I didn't want to call animal control, because I didn't want the little guys to be captured and euthanized. It was unfortunate that our homes overlapped and we couldn't live comfortably together, but even still that wasn't their fault.
I was getting ready to make some phone calls, but we started seeing less and less of them. They didn't play in our yard in the mornings anymore, and we didn't even see them darting through the empty lots next to us anymore.
About a week later we brought in the machinery and graded and tilled our lot to prepare it for grass and landscaping and fencing. Now our house looks more like this:
 And it stayed like that for a couple weeks, and without a speck of vegetation around, I think the foxen (as I lovingly called them) decided to relocate themselves to a nicer neighborhood. We have seen no evidence of them around for more than a month now, so I feel confident they have vacated the premises and I like to believe they found a much nicer home, away from cars, people and other weird stuff that would disrupt their way of life. But they were our little buddies for a couple of weeks and that still makes me smile.
So here's the house in the naked lot just waiting and ready for some love. And if you are perceptive or know anything about fence building, you've noted the load in our driveway and can take a guess at what the first order of business will be...

Thursday, May 3, 2012

Backyard Beautifucation: Part 5 (The Shead!)

So you have seen pictures of our yard-- and pictures of the things we love. Let me show you a picture of something Z doesn't love in our backyard:
This is the part of the yard that is rarely photographed, and often pushed out of the way when it is. See that dirty plastic tub? Thats where we store our outside pillows, tiki torch fuel, bug candles, some funnels, random garden stuff, and grilling tools. It's kinda a junk drawer... but you know, the outside version. Then behind it are a couple rakes that just lean against the fence, because they have no where else to go. Also, recently our crumbling, needing to be thrown out tiki torches found a home there as well. And it was starting to look cluttered, dirty, and generally unappealing. And Z would comment on it every time we were in the yard.
I know! I would say, But where are we supposed to put that stuff? We don't really have room for it inside.
then the other day Z said... what if we put a cabinet or something up by the house, and we could make it tall enough to put rakes in.
Not a horrible idea... but first you need to see another rarely photographed view of our backyard:
We do not exactly have a lot of space in which to put a cabinet. So its not like we could just go to The Depot and get one of those pre-fab plastic mini sheds to stick in our yard. (besides, those things are ugly as sin, amIright???)
Function over form Z was all... I could slap some plywood together...
Form over function Valerie was all... We could build a lovely little corner cabinet that would fit in that space and look adorable and we could have a cute little drink station for entertaining and run twinkle lights around it...
And we sat and looked at each other for a few quiet minutes, and then someone suggested, we should draw something so we know what the other person is talking about. So I pulled out the sketch book and we doodled for a while, and came up with some ideas, and when Z was at work that evening, I took some measurements, and drew up some plans. My dad called that evening, and I asked him if he thought we could build a little corner cabinet for our yard. And my Dad-- who is learning not to question my moments of genius inspiration (insert winky face)-- said, Draw a picture of what you want, and I will see if I can make it happen.
So I drew this:
Please don't make fun of me... drawing and engineering is not really in my skill set.
Do you like the nice list I made of things we could put in the cabinet???
and when Z saw it, he was excited. And when my Dad saw it, he was excited too. He claims he was also toying with the idea of using cedar planks so it would match the fence... So we were all on the same page.
And then my dad, because he's one of those engineer types, took my simple drawing, and put it all into a CAD program and printed us out plans with measurements and angles and full color views from every angle. This thing was happening, and it was going to be over-engineered as well. :)
My dad Has never been known for his spelling and language skills-- he's a great engineer, who needs 'em?-- and when he was labeling the plans for our mini-shed, he spelled: S-H-E-A-D. When Z and I saw it, we thought it was funny, and started calling our project The Shead. My dad didn't like that we were making fun of his spelling-- but we assured him we were not trying to mock him and we found it endearing. We liked having a special name for our project!
Anywho... we headed to the Home Depot to pick up the supplies. This wasn't a cheap project-- but it was done the right way-- with all pressure treated wood so it would not rot out after one season. All our material: wood, screws, glue, and hardware, came to around $150. However, a similar in size and shape plastic shed was $159... so we're not too torn up about the cost.
Enough talk onto the building.
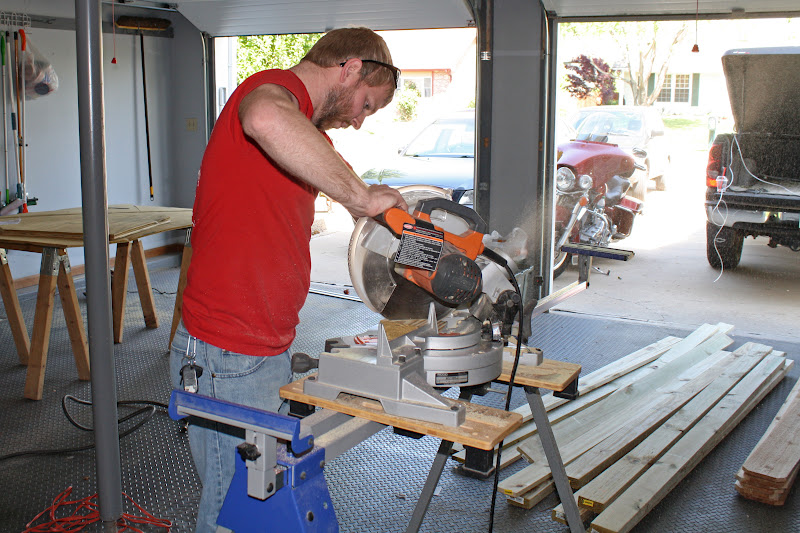
Mmm... my man and power tools... Sexy, no?
Zachary and my dad worked in my parent's garage to build it. And... Sam even helped!
 Okay, so that picture was completely staged. Sam played inside with Grandma most of the day, but he did come out and watch his Daddy assemble the doors... and clutched a pencil for dear life while he did so. Of course Mama forced a photo opp. (Oh, come on! What was I supposed to do?!)
This is my dad working on the frame. Because it was a small space our cabinet needed to fit into, we decided a corner cabinet would be the best use of space, and the most aesthetically pleasing. But it was still small, so we opted to keep the back of the cabinet open so we wouldn't loose any space (we can shove our stuff all the way up against the brick wall-- no loss of space there!). This also would reduce the cost of material, and lighten the cabinet considerably. That puppy was all kinds of re-inforced and heavy as crap when it was all done.

It was evening by now, and the guys started hanging the doors... when we realized the hardware (hinges) we had purchased were not strong enough to hold up the doors. So sweaty and covered in sawdust we all loaded into the truck and went back to the Depot to get some bigger ones.
When we finally got back, they hung the doors and installed the hardware... and it looked great! But it was around 9:00 when we finished for the evening.
So we waited until day 2 to install the thing. But before we put it in, there were a few other things that needed to happen. Let me remind you of this-- the before pic looking from the back of the yard toward the house:
It's kinda hard to see in this picture, but next to the house it's really shady, and difficult to grow grass. On the one side we have that lovely airconditioning unit, and beside/behind that is a mud pit. The other side of the steps (where we were about to put The Shead) was not much better. So Z had the idea to do some landscaping... we put down some edging and mulch around the AC unit to cover those muddy areas, then mirrored that shape on the opposite side of the steps. Hopefully it will make the 'yard' look a little less patchy, and a little more balanced and appealing.
But our mulching and Shead installation kinda ripped out what little grass was hanging on in those corners... so we ended up laying down sod in that half of the yard. And because I am always running around without shoes and my husband and grossed out by all the mud and possible poo I may be tracking through when walking barefoot in the grass, we included a small stepping stone in the middle of the grassy patch in front of the Shead. I was deeply involved in the landscaping/mulching/sodding/stone laying process, so we have no process pictures, just this magical after:

Hey look! Mulch! Sod! Shead! Probably got there by elves or internet magic or something.
Anywho, here's what The Shead looks like empty... there are shelves on the left to store pillows, candles, tiki torch fuel, garden and grill tools, and other outside stuff. The tall open space on the right holds our rakes, shovel, pooper scooper, and other unsavory items Z wanted to remove from their former leaning-against-the-fence-by-the-grill-position. Here's what The Shead looks like filled:
And once that the doors are closed and latched that side of the house, and the filled completed Shead looks like...
AH! Lovely, beautiful, practical Shead... We love you. You look so very handsome in our backyard. I am so pleased!
And here, you can see the rakes and storage have been hidden from view bringing this side of the yard up to par with the rest of it.
And with the completion of that landscaping project, the building and installation of the Shead-- I declare Backyard Beautification complete! Yay! I could not be happier. with how things turned out.
Wanna see some before and afters? Yeah-- meeeeee too.

Before
 
 After
Grass, Fence, Clothes Line, Herb Garden

Lighting

Before:

After:
Lighting, Shed, Mulch, Sod, Step Stone
 Before:

 After:
Lighting, Shed (storage), Fence, Grass

 I feel like this has been a long journey... but I am glad you followed along with us! 
The only thing left to do to our yard is to throw a party to break it in!

Saturday, April 28, 2012

Backyard Beautification: Part 4 (Let there be light!)

Most of our time spent in our backyard is on the patio after dark. My husband works evenings, so we eat dinner around 9:00 or later most weeknights. (not ideal eating habits, I know, but it's important to me that we still eat a meal together.) We have a porch light... but it doesn't really spread much light outside it's 3 ft radius, and also it attracts bugs. Other than that we had some sad, crumbling, bamboo tiki torches, but they didn't stand up very well, making us a little scared to light them, given how close they were to she saddest, oldest, driest wood fence EVAR.
It was sad. wanna remember how sad? It was this sad:
And I can't even show you haw sad it was at night-- the time in question right now-- because it was just dark darkness out there. Not really a warm and inviting place to talk, eat and enjoy summer evenings.
So we had to make some changes.
First the sad, leaning, tiki torches had to go. We replaced them with some slightly more expensive (but worth it because they are safer and handsomer) (Is handsomer a word?) copper torches. These puppies have a non-leany metal pole that screws securely into metal stakes in the ground. Also, they are slightly smaller than our previous bamboo torches, making the flame size safer for our small wood-surrounded space.
I think they look pretty slick:

 I know the back ones kind of blend into the fence, but there is one at each of the corners of the patio. Here's a shot from the other side of the patio:

I am quite happy with the new tiki torch situation. But it still wasn't a perfect solution to our lighting dilemma. Because there may be times when it's too wet for tiki torches, or we will be outside to briefly to light them all up... but we still need a little light out there.
Sooo... we headed off to the good ol' Home Depot to look for some lighting options. We have some specific needs, though. We have no power outside. So anything we put out there had to be solar. Which kind of eliminated my grand plan of stringing up our patio with lovely clear bulbs:

Source: houzz.com via Valerie on Pinterest

Z told me it would be too much, and interfere with the tiki torches anyway, but I thought it would be cute. Anyway, my function over form husband suggested we get some solar powered flood lights to mount on the fence... and I was all, meh, it's not real pretty, but it will be okay... I guess... sigh...
But then when we were at the depot we found a decent compromise. We got this little pack of smallish solar powered lights specifically meant for-- get this-- mounting on you fence. Awesome.
Oh, clever you! Had you already spotted them in the other pics? They were super simple to install... just two screws in the fence and pop them in place. They are made of metal, and aren't too cheesy looking, even though they were reasonably inexpensive (approx $20 for the two pack). You can see the little solar panel on the top, and since that is the sunny part of the yard, it works great. They come on by themselves after dark, so we don't even have to run out in the dark to flip a switch. The light the provide is a soft glow, enough to illuminate the dark side of our small space. I think the boys even appreciate it when they are doing their business at night.
They've been up for a week now, through a couple thunderstorms even, and seem to be holding up well, so I am quite pleased.
And now for your viewing pleasure... after a long weekend of backyard beautification, this is what Z came home to last Monday evening:
I think we nailed the warm, cozy, inviting vibe we were going for... because we ate our dinner out there then spent another hour or so just enjoying our well-lit patio. Ahhh... it just felt good.
I've got just one more project to show you... and this backyard transformation will be complete! Yay!

Friday, April 20, 2012

Backyard Beautification: Part 3 (Growing up!)

I mentioned in part 1 that I would really love an herb garden. And our spacious lot is just the place to fill with acres of fragrant herbacious-ness. Right?
Maybe not.
I was going to have to get creative, because non-concreted areas are in short supply around us. Container garden it is. However, containers can take up their fair share of space as well, particularly if they are large and/or numerous which mine would have to be to house the herbs I wanted to grow. So I was stumped.
And then one day on the front page of Pinterest, I saw this:


...and I said, EUREKA! We need to go vertical!
Why didn't I think of that sooner? And it was simple enough to make too... Iron rod, terra cotta pots that already have a hole in the bottom... this was so simple it was genius! So I got to work. I gathered my materials:
 and you can see in this picture I already have the metal rod in place (it's in the grass to the right of the table). My dad procured this for me (he's a machinist and has access to all kinds of wonders at his shop.) It is a very strong steel rod (probably stronger than it needs to be, really. My dad could tel you all about what type of metal it is and strength and all that... i just nodded, okay.) We guessed the size of the rod with a little trial and error. It goes down into the ground about 3 ft. I wanted to make sure this thing was nice and sturdy. My dad sharpened a point on one end so it would be easier to drive into the ground.
After pounding it into the ground, we stacked up the pots to make sure it was the right height-- didn't want it sticking out the top, but wanted all the pots secure. We had to take them off and pound it a few inches further into the ground. Here's what my naked pots look like:
I was worried about them being secure at their angle. So I dug a little hole under the corner of the bottom (largest) one to make it nice and stable even though it sits at an angle. The rest of them just rest on the upper edge of the one below, and once the soil is in it holds pretty secure.
So now I started with the bottom and filled the pots with soil then potted the plants as per the instructions on the side of each plant. And while I was doing all of this, Sam chilled in the kitchen, but kept an eye on me from his vantage point by the door.
It was pretty simple to put together. Herbs grow really well in containers, so this design for an herb garden worked well. And when it was all put together, it looked like this:
I planted (from bottom to top): Rosemary and oregano, thyme and chives, flat leaf parsley, basil, cilantro, and lavender. It fits well in that corner of our tiny yard, and it smells awesome too. Mmmm... herb-y goodness.
So we are slowly taking our sad, dead, smelly yard... and turning it into some place pretty, green, and fragrant (in a good way!).   It's becoming a place we would like to hang out and hopefully will be a place we can entertain. We still need to tackle some storage and some lighting, but we are well on our way.
Just in case you forgot... here's what it looked like last fall:
and here's what it looks like today... quite a difference.
We've got just a few more projects before our Backyard Beautification is complete... an exciting one this weekend! Can't wait to show you whats in the works! :)