Showing posts with label polish. Show all posts
Thursday, March 14, 2013
Ain't easy being green.
Poor Kermie. What a rough plight.
Fortunately... you don't have to suffer the same. With that upcoming green holiday and the interwebs at your disposal, you've got about every idea imaginable at at your fingertips making it (wait for it...) easy for you to be green.
Okay. Done being corny.
We don't get crazy into every little holiday, but with St. Patrick's day coming up I thought it was a great time to share one of our favorite breakfast treats around here.
Green Smoothies!
What's that? You don't struggle to get enough healthy, leafy greens in yourself and your family? Well then, I guess you can stop reading. This post is not for you. (And I am rolling my eyes in your general direction-- healthy over achiever. No one likes people like that, you know?)
I do struggle... also it's hard to convince my toddler to chow down on some spinach, no matter how I try to convince him of it's health and Pop-eye benefits. But he enjoys sluuuuurrrping down a smoothie in the morning.
I know the green smoothie thing is not a new craze by any means, and I probably don't make mine healthy-to-the-max like some people do... but I feel like even a little green is a big win where it would otherwise not be consumed. So here are my fav recipes.
Pineapple Mango Greenie
1 cup fresh baby spinach
1/2 cup cucumber pieces
1/2 cup pineapple pieces (fresh or frozen)
1/2 cup mango pieces (fresh or frozen)
1/2 cup greek yogurt
1 cup orange (or mango, or pineapple if you have it!) juice
Stick it all in your blender and blend. Make sure you have enough liquid to cover all your fruit/veggies... you can add water if you need to.
Yummy and adding green to our diets. Win win. Sam took a sip and said "Mmmmmmm!" which is his new trick-- he also said that about a cheerio he found in the couch cushion-- but don't let that taint your opinion. It really was delicious.
I also use THIS GREEN SMOOTHIE RECIPE I got from my friend Danielle, over a year ago. It's very similar... just with berries. Plus she adds flax seed because she is so smart and always thinking a step ahead to fill her family with healthy stuff. Over achiever.
And I'm like a half achiever.
But I consumed a cup of leafy greens for breakfast today... sooo... beat that, toaster waffles!
And... one other little green thing we did to 'celebrate' St.P's day.
I am assuming you have gathered from these posts that I am a little into nail art these days. So when I saw this on pinterest, I knew I needed to put together a cute little gift for my Mani-Buddy, Amy Lee! (Ooh! Shameless plug: Amy started a nail blog. You should check it out. fancyside.blogspot.com)
I definitely had to get myself some of this awesome sparkly green-ness. I was wearing it earlier this week and I love the deep emerald shimmer.
...but we also went to go see the new OZ movie this weekend (it was cute, but probably a little intense for kiddos...?) and this polish made me feel very 'wicked witch'. Which I kind of loved. Dark and green and magical. (The color is Revlon:Rain Forest)
So there you have it. Not much of a celebration for St.P's around here, but enjoying the day's favored color. What kind of green things have you been doing? Been eating (drinking?) your veggies? Painting your nails? Indulging in fantasies of witches and wonder and the emerald city?
Monday, February 25, 2013
Just another Mani(c) Monday...
I hope you all are singing that song now... because it's going to be stuck in my head all day. UGH.
As promised... Mani(c) Monday, Part 2!
I shared with you a couple weeks ago about my new(ish) nail art hobby. I havn't been doing nails very long, so I am no expert. But I wanted to give you a few resources and show you some of my tricks and tips for nails and organization of all your stuff! As well as... more pictures of recent Manis! (Because whats the point of having fun nails if there is no one around to oooh and ahhh???)
So lets dive right in.
This is my big case where I keep all my polishes and nail accoutrements. I got it at Target with all their storage tubs and whatnot. It is the perfect height to hold polishes.
The bottom layer holds all my polishes. (Yup, those are metallic sharpies! I used them to create a look that I showed you in my last Mani(c) Monday post, but there is also a tutorial here, if you are interested in how/why to use them!)
The top section holds tools, remover, brushes... and everything else. Actually, here is a comprehensive list of all the things you see up there:
Nail clippers, Cuticle nippers, assorted files, orange wood cuticle sticks, cuticle oil, Cotton balls/cotton swabs/cotton rounds (the rounds are my preferred tool for polish removal, they hold up the best), polish remover, Acetone, nail glue, brushes, dotting tools, a shot glass (for acetone), a pen, swatch book (not pictured), and flexible plastic boards (not pictured).
They all fit in there nicely, the lid (with a handle) snaps closed and it's all comtained and can be stashed away. Although, mine comes out frequently enough, recently it's been stashed on the unused kitchen chair.
When Amy first turned me on to nail art, I never wore polish because I didn't know how to polish my own nails, and found it too expensive to get professional regular manicures. I thought I was not good at painting-- and maybe I could do my left hand, but definitely not my right. She told me with practice you would see quick improvement... and let me in on this secret:
**When painting your own nails, start with your dominant hand. (I am right handed, so I paint the right one first) Wait for it to dry completely before moving on to your non-dominant hand (which should be much easier!) You will be amazed, just that little switch will make a huge difference in your polishing skills!
Next she pointed me toward the god old internet where there are countless blogs and beauty websites with tips and tutorials on painting nails. Here's a nice easy (slow... long?) video tutorial: Painting your nails like a pro!
I also love this graphic showing how to polish a nail:
...and if you click all the way through to the originating sight, she explains the graphic in depth, as well as a great tutorial/explanation of tip wrapping!
My sister checks out my manis and goes on about how creative I am... not really. When I want a new look, I pull up a pinterest search and see if something inspires me. You can check out my Nail Muse Board on pinterest... an ever growing board with lots of fun ideas, lots of them with tutorials on how to make it happen! So helpful!
You can acquire a few pretty inexpensive tools that will make nail art so much easier, and open up a whole creative world for you! I have this brush set, and this dotting tool set. For under $10 you can have both and a lot of fun with new nail art options!
There's this problem you might experience when you start polishing, and it happens like this: One day you are a normal sane happy person who can trot past the nail care section in any store without and second glance... then you start polishing all your nails and all of a sudden you are a crazed lady who bursts into the store running to the nail care like I WANT ALL THE COLORS!!!!
No. For real. That happens. It's a problem.
And then You are all, I have so many colors??? I don't even know what colors I have anymore! And then you need a way to keep track...
When a new color enters my life, it goes through this quick simple cataloging process, ready?
I created this swatch book (that you can have, you're welcome!) by printing off the sheets, cutting them in half, punching a hole in the corner and putting them on a ring.
Each new color gets painted in a swatch box under the correct color category, and then I write the brand and name below.
Next I paint a tiny swatch on a label sheet. After it dries, I use a hole punch to punch it out, then peel the back off the color sticker I just made, and stick it to the top of the bottle. You may have noticed in the pictures (way at the top) that each of my bottles has a color dot on top? Easier to find what polish you are looking for when you staring at a big tub from the top.
So go print yourself one... it honestly helps with decision making! :)
Another problem I had was no 'safe' location to do my nails. I did them on my husbands desk and took the wood finish off with polish remover. I did them on the kitchen table, and spilled gold polish. I tried to put paper towels over my work surface, but they didn't protect against much. And then I finally thought of the perfect soloution!
These are a couple of those flexible cutting mats (I got a pack of 4 at Target for $6, but you can get them anywhere...) These were the perfect soloution! They are cheap, easy to store (they were the perfect size to fit right inside my case) and they contain my mess... I don't have to worry about acetone soaked cotton ruining my table (I know, obviously my table is in rough shape anyway, but thats a project for another day), or paint drips... it also gives me a place to drop polish for art, or try out techniques or colors together before putting it on the nail.
These are a mess right now (I purposefully left them that way so you could see they are effective) but the polish mess wipes off easily with a little remover for a nice clean work space!
Another thing that can prove to be problematic... broken nails. You know that you've grown yours out before, only to have one beautiful one break/crack at the base. You don't have to nub them all! There is hope! I have used this method to repair many broken nails... works great! In the tutorial they say to use 'stretchy fabric' but I use the gauze from a tea-bag, or coffee filter. Works great! Save the Nails!
One more thing...
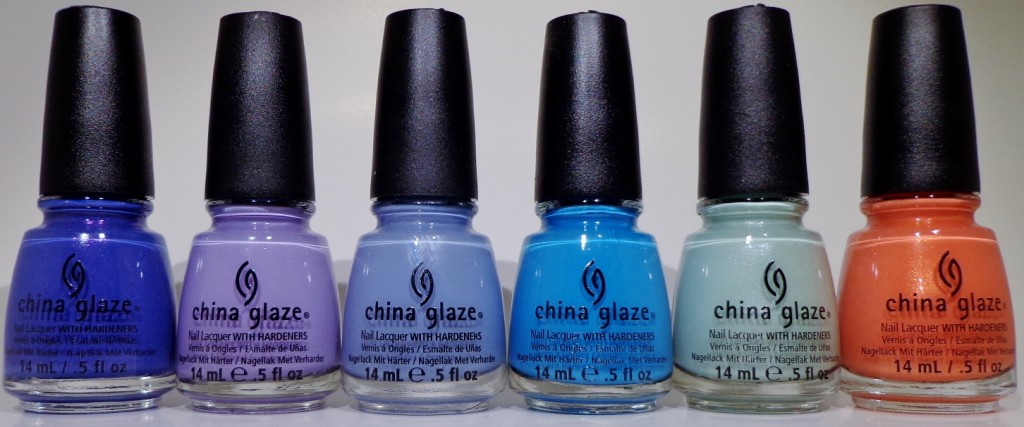
Cynthia over at Of Life and Laquer is hosting a giveaway of the China Glaze Avant Garden collection. It's pretty.
Yes? Go HERE to enter, and check out her site and say hey, and/or Thanks! Because she's way cool for doing a giveaway of pretty stuff...
So this is a long enough post... but hopefully it gave you some tips and resources to venture into the world of nails polish and art! It's truly a relaxing and fun new hobby for me.
Do you have any tips, tricks, polish suggestions, pictures, or techniques to share? I'd love to hear about whats going on your nails!
As promised... Mani(c) Monday, Part 2!
I shared with you a couple weeks ago about my new(ish) nail art hobby. I havn't been doing nails very long, so I am no expert. But I wanted to give you a few resources and show you some of my tricks and tips for nails and organization of all your stuff! As well as... more pictures of recent Manis! (Because whats the point of having fun nails if there is no one around to oooh and ahhh???)
So lets dive right in.
This is my big case where I keep all my polishes and nail accoutrements. I got it at Target with all their storage tubs and whatnot. It is the perfect height to hold polishes.
The bottom layer holds all my polishes. (Yup, those are metallic sharpies! I used them to create a look that I showed you in my last Mani(c) Monday post, but there is also a tutorial here, if you are interested in how/why to use them!)
The top section holds tools, remover, brushes... and everything else. Actually, here is a comprehensive list of all the things you see up there:
Nail clippers, Cuticle nippers, assorted files, orange wood cuticle sticks, cuticle oil, Cotton balls/cotton swabs/cotton rounds (the rounds are my preferred tool for polish removal, they hold up the best), polish remover, Acetone, nail glue, brushes, dotting tools, a shot glass (for acetone), a pen, swatch book (not pictured), and flexible plastic boards (not pictured).
They all fit in there nicely, the lid (with a handle) snaps closed and it's all comtained and can be stashed away. Although, mine comes out frequently enough, recently it's been stashed on the unused kitchen chair.
| Mermaid nails! Can you see the mermaid scales? OPI: Passion, Zoya:Ivanka |
**When painting your own nails, start with your dominant hand. (I am right handed, so I paint the right one first) Wait for it to dry completely before moving on to your non-dominant hand (which should be much easier!) You will be amazed, just that little switch will make a huge difference in your polishing skills!
![]() |
| Zoya: Jana with chevron accent |
Next she pointed me toward the god old internet where there are countless blogs and beauty websites with tips and tutorials on painting nails. Here's a nice easy (slow... long?) video tutorial: Painting your nails like a pro!
I also love this graphic showing how to polish a nail:
...and if you click all the way through to the originating sight, she explains the graphic in depth, as well as a great tutorial/explanation of tip wrapping!
![]() |
| Peacock Nails! SH: Black and Blue |
![]() |
| SH: Trouble Maker |
You can acquire a few pretty inexpensive tools that will make nail art so much easier, and open up a whole creative world for you! I have this brush set, and this dotting tool set. For under $10 you can have both and a lot of fun with new nail art options!
![]() |
| Bubble Mani essie: Beyond Cozy, NicoleOPI: It's all about Glam, China Glaze: Flyin' High |
No. For real. That happens. It's a problem.
And then You are all, I have so many colors??? I don't even know what colors I have anymore! And then you need a way to keep track...
When a new color enters my life, it goes through this quick simple cataloging process, ready?
I created this swatch book (that you can have, you're welcome!) by printing off the sheets, cutting them in half, punching a hole in the corner and putting them on a ring.
Each new color gets painted in a swatch box under the correct color category, and then I write the brand and name below.
Next I paint a tiny swatch on a label sheet. After it dries, I use a hole punch to punch it out, then peel the back off the color sticker I just made, and stick it to the top of the bottle. You may have noticed in the pictures (way at the top) that each of my bottles has a color dot on top? Easier to find what polish you are looking for when you staring at a big tub from the top.
So go print yourself one... it honestly helps with decision making! :)
![]() |
| Valentine's Mani! essie: forever yummy |
These are a couple of those flexible cutting mats (I got a pack of 4 at Target for $6, but you can get them anywhere...) These were the perfect soloution! They are cheap, easy to store (they were the perfect size to fit right inside my case) and they contain my mess... I don't have to worry about acetone soaked cotton ruining my table (I know, obviously my table is in rough shape anyway, but thats a project for another day), or paint drips... it also gives me a place to drop polish for art, or try out techniques or colors together before putting it on the nail.
These are a mess right now (I purposefully left them that way so you could see they are effective) but the polish mess wipes off easily with a little remover for a nice clean work space!
![]() | ||
| Red Carpet Nails for the Oscars last night! China Glaze: Passion, Zoya: Raven, L'OREAL: Caught Red-Handed |
![]() | |
| Disco Barbie Nails! (as named by my sister) OPI: Suzi's Hungary Again, essie:Beyond cozy |
Cynthia over at Of Life and Laquer is hosting a giveaway of the China Glaze Avant Garden collection. It's pretty.
Yes? Go HERE to enter, and check out her site and say hey, and/or Thanks! Because she's way cool for doing a giveaway of pretty stuff...
So this is a long enough post... but hopefully it gave you some tips and resources to venture into the world of nails polish and art! It's truly a relaxing and fun new hobby for me.
Do you have any tips, tricks, polish suggestions, pictures, or techniques to share? I'd love to hear about whats going on your nails!
Labels:
Mani(c) Monday,
Nails,
polish
Subscribe to:
Posts (Atom)