What are you trying to find???

Showing posts with label holiday. Show all posts

Monday, February 4, 2013

2012 Family Pictures


A few months ago we had family pictures taken.
My friend Jacie of Dance With Me Photography took them for us. Jacie does mostly newborn and children photography... but she did such a great job with Sam's NB photos that I coerced her into taking some family shots for us. Just as expected, she did a beautiful job once again, and I LOVE the images she captured.
Sam was happy and cooperative, despite it being cold and so windy.
(Full disclosure, this picture was taken right before he found some goose poop and tried to sample it!)
Photographers love Z because he is an awesome and photogenic Daddy. I think this picture is so sweet.
This is a favorite! Love this little man so much!
Another Favorite... my smoochy little Sam-- he knows he's the star of this photoshoot. Look at that star power!
My only regret is not getting any shots of just Z and I (My fault!) I didn't think about it at the time... but as I was going through the final shots later, I so wished I had. 
Regardless, I love these beautiful shots of my family-- taken in our favorite park, literally, the day before they tore it up to build some big building in it's place. So sad!
Jacie did a great job. You can visit her FB page here if you want to see some of her other work, (Yep, that's baby Sam in the header!) but (sad for you) she is currently taking a year long hiatus to focus some time on the ever changing needs of her growing family. Sad for her clients, but so SO good for her family! Good for you Jacie! Thank you again for your beautiful work.

And... I know we are well past Christmas, but I went MIA for a season, so here is the Pogemiller 2012 Christmas Card featuring one of our beautiful family photos...
Wishing you a lovely holiday and merry and bright new year!


Friday, November 30, 2012

How To Shrink Your Tree

Four years ago, when I was living in my first little apartment after college, christmas time came along, and I had no tree. So I ran to the nearest walmart and grabbed an averagely cheap, pre-lit, full size (6.5 ft) artificial Christmas tree. I don't love artificial trees, but it was the only kind our apartment complex allowed... so I got it. It was not a thing of beauty... but it was a thing. It served it's purpose and looked lovely once it was plugged in and sprinkled with other shiny things.
Fast forward a couple years... and I am living in a smaller townhome with a baby on the way and our spare bedroom is now a nursery, and our basement is now a spare bedroom, and we have no storage or wiggle room in our furniture layout... or room to assemble and display a full size tree for the month.

So last year we put off Christmas Decorations while we searched for a tree solution. We decided we could set a mini tree on top of the buffet in the living room... but after about a week of searching for an acceptable mini size tree that didn't break the bank or look stupid, I had given up. I told Z it was hopeless.
Then I started thinking about my 6.5 ft tree. And how it comes apart in three separately lit sections. And how the top third was still a decent size, and just had a little peg of sorts that fits down into a pole running through the center of the other trees... and then I knew all I needed was to assemble a base and we'd be in business.

So I inlisted the help of my father (this was last year, I was 9 months pregnant and not allowed to use power tools...) and in about 5 minutes he screwed two pieces of wood together and drilled a hole and we had a tree stand.

I came home, dug out the top of our tree and popped it in the little base.
Admittedly, I didn't hear the angels singing yet. I mean, it's a little sparse and sad still.

Buuuuuut...
Once it was lit, wrapped in glittering ribbons, and bedazzled with all manner ornaments...

I think it looks pretty darn good. This year I got it all out again to set it up, and realized that this is really a much better situation for a 1 year old anyhow. Some day, we'll get the rest of the little tree out again, but for now, we've got the shrunken guy, and he's still merry and bright!

Wednesday, November 21, 2012

The Perfect Roast

It's been quiet around here, I know. I have been sewing away on some bowties and suspenders for Holiday Sales. Interested? Check me out on Facebook! That's right, One Sassy housewife is now on Facebook! Moving up in the world.
Anyway...


We're getting down to it, aren't we? A few days to Thanksgiving, and that's the official start, isn't it? You might love it, you might dread it, you might not celebrate it, but in this country it's pretty hard to ignore it. Christmas is coming, my friends!
But I better back up before my husband, Mr. Spirit-of-Thankgiving gets all on my case. Lets talk about Thankgiving. Are you having a big meal with friends and family? Are you roasting a bird? Are visions of stuffing, yams, and greenbean casserole already dancing in your head???
Would you like to know what will be on my table come Thursday?
Roast Beef.
Yup, roast beef. We are not huge turkey people, and our family is small, and my husband requested roast beef. Who am I to deny him. Especially because I make a mean roast. And I like to see my husband scarf down anything that I make-- but especially slow roasted meaty goodness.
Roast Beef is one of those things that can be so good, or so... not. There doesn't seem to be an in between but you know you've had good roast beef, and you know you've had bad, right? Making a good one is not so complicated; It takes a little attention, a few hours, and a good family recipe. I thought I would share mine with you this week... just in case you are an 'outside the box' thanksgiving-er and needed a recipe for this week. Wink.

This recipe--like most things I make-- came from my dad, and is really in truth not a recipe at all, but years of observing him make a sunday roast. Most of my dad's cooking know how came from his mom, but if pressed, he will sheepishly admit that he does not love his mom's roast, and does not make it the same way she does. Sorry to rat you out, Dad. But you do make a darn good roast, and grandma was a sweet, forgiving woman. :)

One of the important parts of making a good roast beef is the pan. You really need a dutch oven. Mine is a Magnalite dutch oven, which has just recently come back into production! Back when I was moving out on my own, my parents scoured antique shops and ebay trying to to find a magnalite dutch oven for me. They are these awesome cast aluminum dutch ovens... it's the only thing grandma would cook in, and the only thing Dad will make a roast in too. I have a couple of really expensive and larger dutch ovens, and they would work too, but nothing NOTHING is better than the magnalite for a roast. And thats all there is to that. Enough about hardware, onto the foodwares...


Get your dutch oven on the stove top and nice and hot. Throw in enough olive oil to cover the bottom, and get it really hot. Quarter an onion and place it (cut side down) in the pan for about a minute.
See all that pretty color? Thats good stuff! Now dig those onions out to a safe place, and clean and chop some carrots into large (but hopefully kind of uniform) chunks, and throw them in there to do the same. Also peel a few garlic cloves (feel free to smash them or leave them whole depending on how vicious you happen to be feeling that day...)

(You see how all my oil is puddling on one side because my burners on our junk stove top don't sit level? That's no good. Don't be like me. Try to find a level burner. But don't make your landlord mad. But level burners are pretty important.)
Do the same thing you did with the onions, about a minute... toss them around a little. You are not cooking them right now, you are just trying to get some color and carmelization going. Pull those out and put them in the safe place with the onions.
Grab a plate and put down a few tablespoons of flour and a good amount of salt and pepper.
Mix that all together, because you are going to dredge your meat in that mixture. Dredge it a weirdo word that just means coat your raw meat in a thin layer of flour.
I am using a tip roast here... because they are typically smaller and I was making roast beef for two. Also the tip roast is typically a little leaner, but that also means it can be a bit tougher and less flavorful. I would usually use a rump roast and one with lots of marbling. All that fat marbling throughout the meat means lots and lots of flavor and it will be more tender and juicy. That is my preferred piece of meat.  But hey, get whatever is cheapest, or available, or best for your family... that's what I've got going on here.
So anyway, dredge your meat, then put it down in the same screaming hot pan, right on top of where the veggies gave up their goodness.
You are going to sear that on all sides. I even stand it up on its sides-- holding it in place with the tongs-- to get a nice seared crust on all sides of the meat... like so:
See all the seasoned, crispy, browned goodness? It's gonna be magical. Again, we are not trying to cook this through at this point, so a hot pan, a quick sear until there is nice color on all sides, and then pull that baby out.
There will be little bits stuck to the bottom of your pan... that's gooooooooood. Now we are going to deglaze the pan. Another fancy culinary term for... we are using a liquid to scrape up all those happy bits stuck to the bottom. Pour in some beef broth... it should get all sizzly and steamy, because remember your pan is still super hot...
Now use a whisk to scrape all the happy bits off the bottom of the pan, and distribute their goodness throughout the liquid.
Once you've done that, put your roast back in the pan, and add enough liquid (beef broth) to cover the meat halfway. I also usually add a nice splash of red wine in there too. If you are adverse to alcohol or if you drank all the wine (oops) it's not ESSENTIAL to the overall turnout, but it does add a nice depth of flavor-- and it's really really good. So think about it.
Or don't. It's your roast.
Pile the onion and carrots and garlic around it the meat.
 And add a little kick with some rosemary and thyme sprinkled over the top. I prefer to use fresh herbs, they are kind of amazing, but we had a stupid hot summer that dried up my herb garden so all I had was dried, and dried herbs are still 100x better than no herbs, but if you have fresh herbs... go that way. But if all you have is dried... sprinkle and go.
Throw in a little more liquid... (the picture above needs more!) and then put your lid on nice and tight and put it in the oven at 275 for several hours. Your house is going to smell great, and you will be curious whats going on, but try not to touch it. The longer it sits undisturbed, the happier it will be.
Try not to be jealous of my pristine oven. I cleaned it myself.
My roast was little-- under 3 lbs, so 3 hours was about right. If you are more like 4 or 5 lbs, you will want 4 hours at least. Low and slow is the name of the game for a nice tender, tasty, roast.
One other thing... that I didn't picture... if you plan to add potatoes to your roast, wait until about a half hour before it's done, then throw in your clean, quartered (or mini) potatoes on the top, and put the lid back on and put it back in. If you put those things in at the beginning they will become mushy and bitter and over cooked and not at all what you want them to be. So a half hour out, deal?
Soooo... you waited your three (or four) hours and it smells amazing in your kitchen and everyone is hungry so it's time to pull it all out of the oven...
Use tongs and a spatuala, and maybe a friend, to help you lift the roast meat out of the pan in one piece. It should be very tender, so this should mostly not be really easy. Let him rest while you use a slotted spoon to fish out all the veggies (and in our house surgically separate them into unique piles so that Z doesn't have to come into contact with an onion, which would really ruin his day.) and put them onto your serving platter.
Then you can make your pan juices into a nice gravy (YES! DO IT!) or not if you are not gravy people (Who are you and why do you not like gravy? Who doesn't like gravy???).
Use a sharp knife to cut the roast into nice chunky slices (Opposite the grain) and transfer those to a platter.
If it's a fancy occasion (or thanksgiving dinner!) I would put it on my fancy platter with some bright green parsley and it would look lovely and everyone would be impressed. If it's a tuesday night, I just throw it on a big plate, and it still tastes awesome and everyone is impressed. So... your choice there.
Easy, delicious, hearty, comfort food. Holiday food. Family food.
Yum.
Here's an unofficial recipe, typed in recipe form for those of you that need that...

Roast Beef  

1 whole (tip, rump, chuck) Roast
2 Tablespoons Olive Oil 
1 whole Onion (Or more)
4 whole Carrots (or more)
2-3 whole peeled garlic cloves
1 tablespoon flour
Salt and pepper
2-3 cups beef broth
1/2 cup red wine
1-2 sprigs fresh thyme (or about 1/2 teaspoon dry)
1-2 sprigs fresh rosemary (or about 1/2 teaspoon dry)


Heat a large pot or Dutch oven over medium-high heat. Add olive oil (enough to cover the bottom)
Quarter onions and cut 4 or more carrots into 2-inch slices. When the oil in the pot is very hot (but not smoking), add in the onions, browning them on both sides. Remove the onions to a plate.
Throw the carrots and garlic into the same hot pan and toss them around a bit until slightly browned, about a minute or so.
Mix flour, salt, and pepper. Dredge your meat in the flour mixture. Make sure it is well seasoned with the salt and pepper. Place the meat in the hot pan and sear it for about a minute on all sides until it is brown with a nice crust. Remove the roast to a plate.
With the burner still on high, use beef broth (about 1 cup) to deglaze the pan, scraping the bottom with a whisk to get all of the bits up and incorporated. Return roast to pan and add enough beef stock to covver the meat half way. Add the red wine (or an equivalent amount of stock). Place the vegetable all around the meat, as well as the herbs.
Cover with the lid, then roast in a 275F oven for 3 hours (for a 3-pound roast). For a 4 to 5-pound roast, plan on 4 hours.

Okay, I'm getting excited for Thanksgiving now! What are you eating? Anything beefy? Or does everyone else in the world just stick with Turkey?


Sunday, April 15, 2012

Easter Suit

Hopefully you assumed from the silence on the blog that i was working on a big project-- and not that I am just a bum. (Although both assumptions would be correct in their own right).
I was working on a big project all last month. Easter was coming and I wanted a special outfit for my little man's first Easter... but I couldn't find any appropriate clothing for infant boys at the stores. Note to children's clothing retailers: please start carrying occasion appropriate boy clothes that aren't stupid looking. Thanks.
I gave up my search and decided it was up to me to create the look I wanted. I quickly determined I wanted a seer sucker suit for Sam. It's just the perfect Easter attire, is it not? I knew I wanted to do this up the right way, though, but after coming up empty handed after a search for infant formal wear patterns... I knew I also had to do this from scratch.
It was my first time drafting a pattern... (more on that later) but it came out pretty well. I only made 3 muslin mock-ups before going with the 4th draft for the jacket. The pants I had a pattern I altered (for a trimmer fit, flat front, and lining). And the yellow shirt I also drafted a pattern for after not being able to find exactly what I wanted. I did everything 'by the book'. I finished all my seams as professionally as I could, fully lined the jacket and pants, sewed in lovely invisible hems, and added fun little details like a button hole on the lapel, and a monogram on his shirt
.I am really proud of how it turned out, and I just beamed every time I looked at my little boy on Easter Sunday. He looked so charming I couldn't help it.


I love this little man! Hope your Easter was awesome, that you got to wear fancy things, and enjoy celebrations with family!

Friday, December 17, 2010

MAKE THIS: Christmas cookies!

Hey everyone! One week from today is Christmas eve, can you believe it has approached us so quickly?!?! Do you have your holiday menu pulled together? I am still working on mine.
Have you decided what kind of cookies you are leaving for Santa? Well, if not, here's some help:
Remember the Online Holiday Cookie Exchange we were going to do, and it was going to be a lot of fun? Well, I only had ONE participant. Sooo... even though yooooou chose not to participate, you still get the benefit of one dear participant's labor and secret cookie recipe. You are lucky, because you really don't deserve it, do you?
And I am sharing my favorite cookie recipe too... and I was thinking about actually sharing the secret ingredient this time that I usually leave out when sharing (I'm a selfish hag like that), but I don't know... I haven't decided if you really, REALLY deserve it. I might have to consult with Santa about offenses and lists and get back with you... but while I'm doing that, Enjoy this cookie recipe from my dear friend ERIN and her so-lovably-ornery-it-hurts son, Dawson:


Aunt Debbie's Almond Sugar Cookies

My son Dawson and I getting the ingredients ready.


 Almond Sugar Cookie Dough
1 cup butter (softened)
3/4 cup sugar
3 cups flour
1 tsp salt
1 beaten egg
3/4 tsp. vanilla
3/4 tsp. almond flavoring
2 TBSP milk


Cream butter and sugar. Add beaten egg, milk, vanilla, and almond flavoring. Gradually add dry ingredients. (Add an extra splash of milk if dough seems too crumbly after all dry ingredients are added.)
Chill overnight. Roll out dough between 1/8 to 1/4 inch thickness. Cut out cookie shapes with your favorite cookie cutters.
Bake at 350 degrees for 5-8 minutes for thinner cookies, 10 minutes for thicker cookies.


Almond Frosting
2 cups powdered sugar
1/8 tsp. salt
2 TBSP. Milk
1/4 tsp. vanilla
1/4 tsp. almond flavoring
2 1/2 TBSP. softened butter

Mix all ingredients together until creamy and smooth. Pipe with frosting tips onto cookies with plain icing and sugar with colored sprinkles.

NOTES:
Yields 4 dozen 2 inch cookies.
Small cookie cutters are great for this recipe. Little bite sized tastes of the almond flavored goodness seem to be just right. :)


Thank you so much, Erin for sharing your cookie recipe! :)
While you were reading that I was chatting with Santa, we have that kind of relationship (You like how I am keeping this going?) And I guess you landed on his NICE list. Some of you BARELY squeaked by. I'm just sayin'...
Soooo... here's my favorite Christmas Cookie EVER. (If you read my old Recipe Blog, you've seen these before. But they are worth the repeat, I promise.) And because I love you, (and because Santa pleaded on your behalf -- though I cannot say his motives we purple selfless, he may or may not be expecting these left for him on Christmas Eve. I'm just sayin'...) I added my additions and secret ingredients this time... You're Welcome.

BEST CHRISTMAS COOKIES EVER

1 1/2 cups all-purpose flour
1 teaspoon baking powder
1/2 teaspoon baking soda
1/4 teaspoon salt
1/2 teaspoon cinnamon

1 cup butter, cubed at room temperature
3/4 cup brown sugar
1/3 cup granulated sugar
2 tblsp honey*

2 eggs
1 teaspoon vanilla
2 cups rolled oats
1 cup dried cranberries
1/2 cup white chocolate chips**
1/2 cup semisweet mini chocolate chips**
1/2 cup milk chocolate chips**

Preheat oven to 350 degrees.
Sift the dry goods together into a large bowl. Set aside.
Cream together the butter, sugars, and honey, then beat in the eggs one at a time. Stir in the vanilla.
Add the dry goods to the wet works a small amount at the time until well combined. Fold in the rolled oats until thoroughly combined. Add in the dried cranberries and chocolate chips.
Use a 1/3 measuring cup*** to transfer the dough onto a parchment lined baking sheet. Use the floured bottom of a drinking glass to smash the cookies flat. Bake for 13 to 15 minutes or until lightly brown.
When they have slightly cooled, but are still warm, transfer the cookies onto a cooling rack. Enjoy with a big glass of milk
 
*The Honey is my secret ingredient. You can leave it out and use 1/2 cup of granulated sugar if you want... but you just don't get the same depth of flavor, and the honey is so nice with the crunchy oats... Yum. PLEASE use a good quality honey... I personally like a local wildflower honey I stock up on at the farmers market. Raw honey is the best... but lets not lie when it's just us-- I will put that stuff on/in anything!
**You can play with different variations of chips, keep the basic amounts the same... but if you don't have minis on hand, don't worry about it... If you are not into white (I can't imagine why you wouldn't be, but if you're not...) double up your milk chocolate. This is my FAVORITE combo though.
***You are gonna look at that and go... Huh-uh. That can't be right, that's a huge cookie. But the bulkiness of the cookie batter means it holds up well to it's size. And once you take your first bite of the big cookie... you will be glad it is extra big!
 
So There you go, kids! Now go put on your aprons and get to work! And next time we have a recipe exchange, consider participating... it makes it more fun for all! :)

Friday, December 10, 2010

SEW THIS: Family Stockings

(DON'T FORGET about the Christmas Cookie Exchange! Still need more people to submit recipes, and it will be great!)

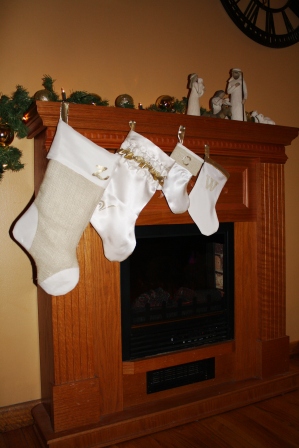
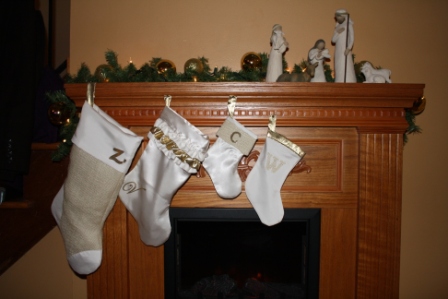
What's that? You were looking at my last post about nativities and noticed that FABULOUS little family of stockings? And you were wondering where I came upon such lovely little gems? And you were hoping if I said I made them there would be a tutorial coming so you could make one just like it?!?!

Well... I am so glad you noticed them! I did, in fact, make them. And, because I love you I threw together a quick Tutorial for the big one... and... have compiled some other resources should you like to try your hand at creating some of your own stockings. :)

I cannot lie. I am so excited about these. This is my favorite project I have done in a LONG time. Can you tell by what a goob i am being in this post?
I knew I wanted to make us some new stockings, but wasn't sure what kind. Soooo... I pulled inspiration from several places and I took some fabrics I had on hand that were neutral/coordinating and went for it. (I know you are laughing because i just called Gold lame neutral. :) haha)
Z's was the first one. I wanted it to look fancy... and Z is always concerned that the stuff I make for him is too fancy, and not very manly. So I used the ivory burlap as his base, lined with muslin, with satin details for the toe, heel, and cuff. I used the wrong side of the satin, which was still pretty... just not as shiny (more manly). I had to add a little sparkle, so the hanging loop and his initial are in gold. Just a LITTLE polish for Z. (He liked the Z because he thinks it's similar to the Z in Zildjian, and he's a drummer, so I guess I did good!)
Mine was next. And I am all girl and ruffles, bows, sparkle and shine. The fancier the better. I used shiny ivory satin, lined with muslin, with satin and gold lame ruffles and a gold hanging loop and initial for me as well. My initial is all scroll-y and pretty... and was a pain in my rear to cut out. (I don't have one of those fancy cutting machines, that is all by hand, baby!) I love the way it turned out though. LOVE it.
Before you get all excited about the little stockings on my mantle... NO I am not pregnant! Though people think that's a cute thing to ask me almost daily. sigh. For the record, I am not amused. Anywho... the little stockings are for the Boys:
I decided not to line them, because it was unnecessary work for a stocking that... well, lets be honest, we have dog stockings, but we don't put much in them. They are just for show. So no lining. Charlie's is in ivory satin with a burlap cuff, and gold initial and hanging loop. Winston's is also in ivory satin, just the wrong side so it's less shiny, and a gold edge and Loop, burlap initial. I cut free hand patterns for each of them, because I wanted them to be just a little bit different shape/size. I think they are cute all hanging on our fireplace.

Okay, so this is not obnoxiously long, I am going to put the tutorial after the jump... (but you really want to click it!)

Thursday, December 9, 2010

LOOK AT THIS: Nativity Parade

Char, at Crap I've Made is hosting a Nativity parade, and I just HAD to participate.


 I love showing off my Christmas decor, and I especially love my nativities. Actually, I first fell in love with my parent's. They have a huge set that a friend made for them, all white glazed ceramic. It is my favorite. As kids we would always get to set it up and we would pull each piece from it's wrapper and hope that we were the one to get to the baby Jesus of the Angel first. Those were our two favorite pieces. I also really love all the animals my parent's set includes. It's pretty much my favorite nativity EVER.

I have two in my home. My mother gave both of them to me. The first is from the first Christmas I had my own apartment. I wanted a nativity, but didn't have the money to purchase one. My mom saw this one in a book order (she works for a school) and purchased it, because it was cute and made us giggle. It folds into a box-- a GIFT, if you will. It opens to a little clay nativity.
I know it's a little simple, and meant for children, and not PC and all that... but i just think it is so sweet. I love all the little details too...

The hair and the tiny ears and toes... I just love it. The sheep are precious too.


And the very best part, a very white little baby Jesus (ha!)... cozied up in his manger looking oh-so-happy to be here. I am happy he is here too!

I know... it's a little childish, but I just think it is so sweet. I love this little nativity, and I can't wait to share it with my kiddos... you know, someday.

My other nativity I received last year as a Christmas gift. I tried desperately to find one like my parent's, but seeing as how theirs was custom made... no luck. I like the fact that theirs is neutrally colored. That works well for me because I change my decor frequently :)

This is the willow tree set... and it's just the 'starter set' nativity. But you've got all the important people... Jesus, Mom and Dad, and animals. And a Shepherd, who is... awkwardly sized in comparison. Not sure if Mary and Joseph are hulking figures, or if the Shepherd is just an especially petite man... either way, there it is. It's simple, so I put some green and lights and sparkly things behind it...
I like how it looks lit up.
This one sits on my tiny mantle... I was going to put it out on the buffet... then remembered that the buffet is a ginormous piece of furniture and my set is very small. So it went on the mantle.

I like it there though, it seems... intimate. Which is kind of what I guess the event it represents was like. You know, as well as being crazy, dirty, loud, smelly, and kind of the weirdest thing that had ever happened to any of the original participants... definitely not elaborately dressed and visits from kings and one or two well behaved animals that we like to put in our nativities...
Be that as it may, Nativities are a lovely tradition, and a wonderful reminder of what we are celebrating this season! Thanks for letting me share mine... And Merry Christmas!

Wednesday, December 8, 2010

LET'S TRY THIS: Online Holiday Cookie Exchange

(Soooo... I know I don't have a TON of followers here, but I thought I would try something and see if ya'll would participate with me, Come on! It's Christmas!)

 It's the holiday time, and we always have holiday parties to attend. I never like to show up empty handed, but I always wonder if my friends are tired of the same cookies every time. See I have a fabulous Christmas cookie recipe... but i have to be honest. I am getting a little bored with it.

Do YOU have a go-to cookie recipe, or a family favorite, or something that your friends always request the recipe for? You wanna have a recipe exchange? (If your answer is no, will you participate just to make me happier anyway?)

Here's how we'll do it, in two easy steps:
STEP 1: Email your favorite holiday cookie recipe (and a picture of your cookies/sweets if you have one) to onesassyhousewife@gmail.com Be sure to include your name, and blog if you want a link back! Please submit this by MIDNIGHT on Sunday Dec 12. (That's right, starting now you only have 5 days to accomplish this!)
STEP 2: Check back next week on Monday, Dec 13th for Holiday cookie recipes from bloggy friends! Hopefully we'll have lots of participation and inspiration! :)


Are you excited? I get excited about cookies! I am super excited, right now, looking at those yummy PICTURES of cookies... or maybe I'm hungry... hmmm...