One of our favorite little guys turned 3 this week. Happy Birthday!
I wanted to make him something fun for his birthday, but I am all about educational toys. I knew I wanted to do something with the alphabet.... and I debated magnets? blocks? But then I thought about bean bags, and it seemed like the perfect idea.
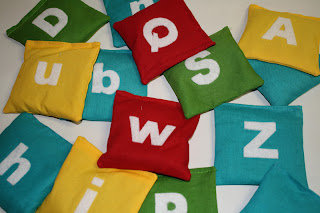
So I made 26 bean bags in 4 different colors. Each one had the uppercase letter on one side and the lowercase on the opposite side. They were pretty simple and turned out really cute. Here's how it's done:
I started by cutting a sheet of fusible webbing to 8.5x11 size so I could run it through my printer. I printed a reverse image of all the letters on the paper side and then ironed it to a piece of white felt.
I then cut out each of the letters (I thought this would be an excruciatingly long process. But it only took me about 20 mins to cut them all out.) I used a swiveling exacto knife and a cutting mat for the centers of letters.
I purchased quarter yard of each of four colors. I cut squares that were 4.5x4.5" using my rotary cutter and quilting ruler. I cut 52 blocks and had just a small amount left over of each color, so I feel like I bought the perfect amount of fabric! (I never measure or plan before I buy, so I am glad it worked out for me this time!)
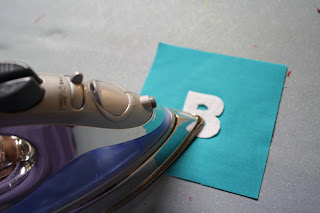
Next I peeled off the paper backing still on the letters, then ironed them down. Each bag had the uppercase on one side and lower case on the other.
I did a quick iron on the front (letter) side, but flipped it over to the back and ironed that side very well. I purchased the ultra-hold iron-on fusible webbing stuff. I had considered stitching every letter down as well, like you would do for an applique, but decided that would be way more work than nap time would allow me. So I bought the ultra hold stuff and ironed it really well, and it seemed to hold firm.
Put the right sides (letter sides) together (make sure your letters are going the same direction up and down) then I serged three sides of each block.
While they were still wrong side out, I went ahead and ironed down 1/4 inch along the top to make that easier on myself. Then I trimmed strings and corners and turned each pouch right side out.
I actually filled my 'bean bags' with split peas. I liked the size and they were on sale. Use whatever you have available or whatever is cheapest-- beans, lentils, peas, rice, or even beads if you have an over abundance on hand. I put approximately 1/4 cup of peas in each bag.
Last step! Pin the top and sew accross. Make sure to back-stitch and lock those threads well so they don't come open and spill the beans. heh heh.
One other thing about the bean bags... I selected the colors randomly, except for the vowels. All the vowels (A, E, I, O, U and Y) are yellow. I thought that might be a helpful trick when playing with the bean bags and (hopefully) learning about the alphabet. But I had 4 colors and those 6 bags just so happened to be approx 1/4 of the alphabet so the colors still look balanced.
I bought a cheap red bucket at The Lob to put them in... and that was that! This whole project was completed about 10 minutes at a time over the course of two weeks. It might take you a couple hours if you sat down and did it all at once, but it was quite manageable divided up.
My husband of course usually thinks I'm crazy when I start a project (he rarely understands my 'vision') and this one was no exception-- you are making what? Why would you do that? But once the bean bags were all assembled he came down and picked one up. Cool! Bean bags! Kids love bean bags. Then he held it and tossed it in his hand a few minutes and smiled. Apparently, Zachs love bean bags too.
Little D seemed to enjoy his gift on his birthday-- although he was convinced the bean bags were bags of candy and kept trying to get them open. Oops. I hope he has fun playing with them!
Now... I have a 1st birthday to attend in a few weeks. Any suggestions on a good gift for a 1 yr old???


awww!! so fun! I love this and ... I'm impressed that your little one allows for this already! it took a whole 2 months for me to even be able to shower properly!
ReplyDelete:-)
I am blessed that Sam is a pretty good baby-- but he takes only a few really short naps during the day. So I get a little manic during naptime. :)
DeleteIf you ever want to make a second batch of those email or call me with how much your time and talent costs you and I'll make an order! :)
ReplyDeleteI wondered to myself if this was the kind of thing that people would buy? For the time and materials involved I think a full alphabet might be more than most people would want to spend on a "toy". But I wonder if people would buy smaller sets-- a name or certain words. What do you think?
DeleteSuch a fun idea. You always make the cutest stuff!
ReplyDelete