What are you trying to find???

Showing posts with label sewing. Show all posts

Monday, November 12, 2012

Sam I am

Well... I am only a couple weeks behind here, and October has long past us, and I am sure your Halloween spoils long since devoured. (Don't pretend like you don't gank your kid's candy) I couldn't let us pass over it entirely without sharing pictures of Sam's first Halloween... I know i'm late, but back up your brain just a smidge and soak in the cuteness that is about to hit you like BAM.

After much debate we landed on the perfect, clever, comfy, warm, and simple to sew costume for the boy. A little Dr. Seuss action... Sam I Am!
I used a pair for Sam's pj's as a pattern and whipped up some pants and a tunic out of fleece. Usually I am anti-fleece, but it's super cheap, stretchy and easy to sew with, which makes it perfect for costumes and fun. Plus it was super warm, which was important as it was super cold out during our festivities!
Sam was a huge fan of his sign, and the felt green eggs and ham. He also rubbed his legs and laughed hysterically the first time I put the fleece pants on him. The thing he didn't love... was his hat.
But with a little sweet talking, fast camera work, and a carrot bribe, we were able to get a few pics of him with it on... before he burst into angry tears or ripped it off and threw it.
Poor kid.
He did like being the center of attention though (he usually does) (Because he usually is). Mama even threw together a quick coodinating outfit, that was a hit with the kiddos! So many kiddos came by our house and shouted excitedly, You're the Cat in the Hat! or It's Dr. Seuss! Which made me laugh. My parents joined in on the fun and donned Thing 1 and Thing 2 visors with awesome blue hair. Good sports.
It was the perfect first Halloween costume for our little Sam I Am. I was happy that everything turned out well. I even got it done early-- and in time to submit pictures and be featured in an online costume parade on one of my favorite blogs! Fun!
Our little Sam was cute as can be. Can you even believe that little boy sitting on my lap is the same one in this picture at just 2 weeks old???
Tiny sweetie Sam I Am baby. How did you get so big???

That was Halloween around here! Better late than never.
I'm already onto all kinds of projects for other holidays and festivities... including a holiday market I am to be a part of next week. Whoo am I sewing my fingers off these days! What have you been up to while I've been away? :)

Monday, October 15, 2012

Baby J Quilt

So a couple weeks ago I threw up this pic just to tease you and let you know I hadn't dropped off the face of the planet:
Lovely pretty fabrics to be made into a warm, soft quilt to welcome my best friend's snuggly little girl into the world! Oh, is she sweet! :) Baby J was born just a week ago, and we got to go visit the fresh little one and her parents last week! 
April is my oldest friend... we've been friends literally since birth, sooooo... what are we at, 27.5 ish years of friendship? That's intense. It's weird that we have kids now. It's so much fun to see our kids playing together, as we sit off the the side and talk and giggle. I don't know when we grew up-- it seems like we should still be the little kids playing on the floor. 
Anyway, this is April's second baby girl, and carrying on a Sass family tradition, every new baby in the family (and April is pretty much family to me) gets a quilt. (You may recall I made this quilt when her first baby girl was born).
 For this quilt I pieced 10x10 blocks or ivory and chocolate dot minky. The backing was  a sweet bicycle flannel print in ivory, chocolate, turquoise, orange, and pink. I loved the print because it was sweet and girly, without being over the top or sickeningly 'baby'. (April and I agree-- we are not a huge fan of 'babyish baby stuff'.)

I 'embroidered' a j in the corner of the backing to personalize it with some chunky pink yarn. I used the same yarn to tie the blanket-- even though I went ahead and 'quilted' it stitch-in-the-ditch style around those big minky blocks.
I used a double layer of extra-loft organic cotton batting so it is extra pillow-y and soft.
The quilt is bound with a turquoise satin binding-- with those mitered corners that always give me fits!
I really liked the way it turned out! I think it is cute and fun, and extra soft. Perfect for a cute, fun, soft new baby J! I think (hope?) April liked it too... she saw it and said-- oh I saw the fabric on your blog the other day and I was hoping it was for us! I'm glad we have a similar asthetic.
Here is my friend (looking fab just a few days after giving birth!) and me holding sweet baby girl. (Don't you think I look good holding a baby draped in pink? We should try for a pink one next time...) Love you and your sweet family, April! Congrats on another beautiful baby girl! Welcome to the world, baby J!


Tuesday, June 5, 2012

Summer Hat!

**Admittedly, this post is more about gratuitous pictures of a baby in an inflatable pool than it is about the project... but come on, that kid-- and those toes! Ohmygoodness, I melt.

The other day I was at walmart (groan) with my husband (double groan) (not about the husband-- we like him, but about the husband at walmart because our bill triples everytime he is there with me. urg.) And we were on our way to the paper towel aisle when we passed that dangerously colorful seasonal aisle and Z was all-- OOOOH! And I was all, NOOOO! And we ended up in the aisle and an inflatable pool ended up in our cart because apparently we have no will power.
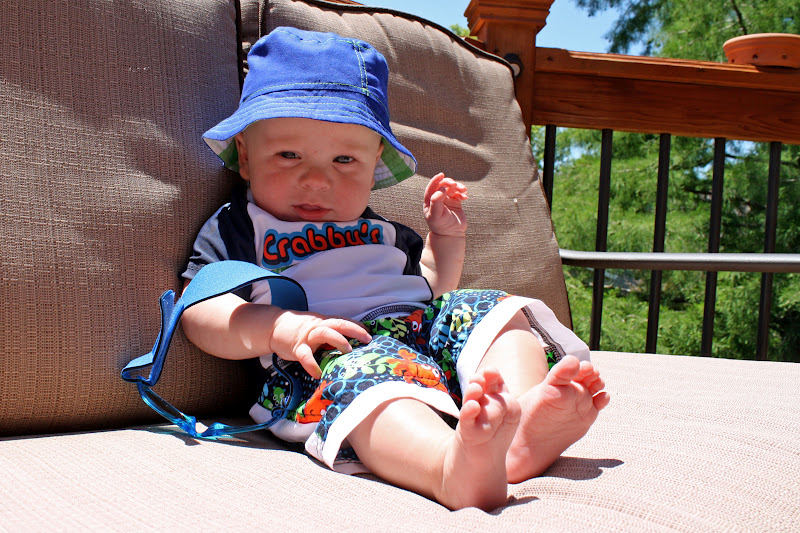
Anywho... Sam was going swimming. He has trunks, and a sun shirt, sandals, sunglasses... everything except something to cover that bald little head of his. The kid is going to need a hat, I said to myself. It was 9:00 p.m. and Sam was just put down to sleep, and the day of swimming was tomorrow... so I plopped myself in front of the computer hoping I could make something happen... and within 10 minutes I was in front of my sewing machine going to town.

I found a free online Oliver+S (LOVE!!!) pattern for a bucket hat. Apparently this pattern was released online when they were introducing their book, Little things to Sew (which is totally already on my wish list, in case you were wondering.) and I am even more in love with Oliver+S than I was before. Adorable classic designs, beautiful pictures, easy to follow instructions... yay! Anyway, enough free advertising for Oliver+S (I was not enticed or compensated in any way for this review. I am just an over-enthusiastic blogger. Oliver+S has no idea who I am. It would be awesome if they did though...)

So I dug through my stash (yay, stash-busting!) and within an hour and a half I had a sun hat for my little man's bald-y head. I used lightweight cotton, blue on top and large green plaid on the inside. Green contrasting stitching on the outside of the hat tied the two together oh-so-nicely. (It's also reversible, which is way fun!)
After playing in the hot sun for a while, I took the hat and dunked it in the water and plopped it back on the boy's head. He laughed as the water ran down his face, I bet he enjoyed the coolness. The fabric dried quickly enough that I did it a again a little while later and it didn't take long to dry after we were out of the water, so it was the perfect sun hat for pool day!
Perfect for splashing in the water.
Perfect for playing with toys.

And perfect for lounging about poolside, even in the sun.
 Oh goodness! Look at those wrinkled piggies! It's time to get out!

It was a pretty quick and easy project, but one that could easily be customized... add decorative buttons, add a pocket on the side, or a big flower for a girl. Pattern sizing goes from 6month-8years, so there is sure to be a size to fit your favorite kiddo this summer. Make one! Make a bunch! It's a fun summer project, and looks dang cute on the little man-- if I do say so myself.

Sunday, April 15, 2012

Easter Suit

Hopefully you assumed from the silence on the blog that i was working on a big project-- and not that I am just a bum. (Although both assumptions would be correct in their own right).
I was working on a big project all last month. Easter was coming and I wanted a special outfit for my little man's first Easter... but I couldn't find any appropriate clothing for infant boys at the stores. Note to children's clothing retailers: please start carrying occasion appropriate boy clothes that aren't stupid looking. Thanks.
I gave up my search and decided it was up to me to create the look I wanted. I quickly determined I wanted a seer sucker suit for Sam. It's just the perfect Easter attire, is it not? I knew I wanted to do this up the right way, though, but after coming up empty handed after a search for infant formal wear patterns... I knew I also had to do this from scratch.
It was my first time drafting a pattern... (more on that later) but it came out pretty well. I only made 3 muslin mock-ups before going with the 4th draft for the jacket. The pants I had a pattern I altered (for a trimmer fit, flat front, and lining). And the yellow shirt I also drafted a pattern for after not being able to find exactly what I wanted. I did everything 'by the book'. I finished all my seams as professionally as I could, fully lined the jacket and pants, sewed in lovely invisible hems, and added fun little details like a button hole on the lapel, and a monogram on his shirt
.I am really proud of how it turned out, and I just beamed every time I looked at my little boy on Easter Sunday. He looked so charming I couldn't help it.


I love this little man! Hope your Easter was awesome, that you got to wear fancy things, and enjoy celebrations with family!

Wednesday, February 22, 2012

Alpha-bean-bags

One of our favorite little guys turned 3 this week. Happy Birthday!
I wanted to make him something fun for his birthday, but I am all about educational toys. I knew I wanted to do something with the alphabet.... and I debated magnets? blocks? But then I thought about bean bags, and it seemed like the perfect idea.
So I made 26 bean bags in  4 different colors. Each one had the uppercase letter on one side and the lowercase on the opposite side. They were pretty simple and turned out really cute. Here's how it's done:
I started by cutting a sheet of fusible webbing to 8.5x11 size so I could run it through my printer. I printed a reverse image of all the letters on  the paper side and then ironed it to a piece of white felt.
I then cut out each of the letters (I thought this would be an excruciatingly long process. But it only took me about 20 mins to cut them all out.) I used a swiveling exacto knife and a cutting mat for the centers of letters.
 I purchased  quarter yard of each of four colors. I cut squares that were 4.5x4.5" using my rotary cutter and quilting ruler. I cut 52 blocks and had just a small amount left over of each color, so I feel like I bought the perfect amount of fabric! (I never measure or plan before I buy, so I am glad it worked out for me this time!)
Next I peeled off the paper backing still on the letters, then ironed them down. Each bag had the uppercase on one side and lower case on the other.
I did a quick iron on the front (letter) side, but flipped it over to the back and ironed that side very well. I purchased the ultra-hold iron-on fusible webbing stuff. I had considered stitching every letter down as well, like you would do for an applique, but decided that would be way more work than nap time would allow me. So I bought the ultra hold stuff and ironed it really well, and it seemed to hold firm.
Put the right sides (letter sides) together (make sure your letters are going the same direction up and down) then I serged three sides of each block.
While they were still wrong side out, I went ahead and ironed down 1/4 inch along the top to make that easier on myself. Then I trimmed strings and corners and turned each pouch right side out.
I actually filled my 'bean bags' with split peas. I liked the size and they were on sale. Use whatever you have available or whatever is cheapest-- beans, lentils, peas, rice, or even beads if you have an over abundance on hand. I put approximately 1/4 cup of peas in each bag.
Last step! Pin the top and sew accross. Make sure to back-stitch and lock those threads well so they don't come open and spill the beans. heh heh.
One other thing about the bean bags... I selected the colors randomly, except for the vowels. All the vowels (A, E, I, O, U and Y) are yellow. I thought that might be a helpful trick when playing with the bean bags and (hopefully) learning about the alphabet. But I had 4 colors and those 6 bags just so happened to be approx 1/4 of the alphabet so the colors still look balanced.
I bought a cheap red bucket at The Lob to put them in... and that was that! This whole project was completed about 10 minutes at a time over the course of two weeks. It might take you a couple hours if you sat down and did it all at once, but it was quite manageable divided up.
My husband of course usually thinks I'm crazy when I start a project (he rarely understands my 'vision') and this one was no exception-- you are making what? Why would you do that? But once the bean bags were all assembled he came down and picked one up. Cool! Bean bags! Kids love bean bags. Then he held it and tossed it in his hand a few minutes and smiled. Apparently, Zachs love bean bags too.
Little D seemed to enjoy his gift on his birthday-- although he was convinced the bean bags were bags of candy and kept trying to get them open. Oops. I hope he has fun playing with them!

Now... I have a 1st birthday to attend in a few weeks. Any suggestions on a good gift for a 1 yr old???

Monday, February 13, 2012

Big Butt Baby Pants

In my last Favorite Things post I talked about Big Butt Baby Pants.
This pattern is designed specifically for cloth diapered babies... with an extra panel and plenty of room in tush and hips for their extra-fluffy bums. Which is actually amazing, because I am having the hardest time finding pants that fit the little man right now! If we can get them over his bum, they are huge around his waist... If they fit his waist, we can't put a cloth diaper on him. No good.
I mentioned to my mom just the other day how frustrating this was to me, and she suggested I make my own. I was all... sigh, yeah I guess I will have to. And then I remembered seeing this pattern a long time ago-- before I had ever thought about having my own babies, or cloth diapering them, or how annoying it would be to find pants for my child's giant bum-- and so I looked it up again. It was exactly what I needed.
 
The pattern can be purchased from the website at the link above. It's a downloadable PDF. (Pretty simple process, if you've never done it before.) The  pattern itself is ultra simple-- just 2 pieces. Easy instructions with pictures. I think it would be a simple first sewing project. It comes with suggestions/customizable options--cuffs, pockets, ruffles-- for boys or girls. Basically once you have the basic concept, the options are limitless. I took the pattern and fiddled with it a little to make a flat front version, and added some of my own details.
Actually... I did a couple cheater things with my pants to make them extra easy:
I started with a pair of maternity corduroys that I hated. That's right, I HATED these pants. I am not particularly sure why I had so much animosity toward only this pair of pants in my maternity wardrobe-- but they made me feel huge and frumpy and awful and I loathed them, especially because they were the only ones that remotely fit those last horrific weeks. Anyway, I kinda wanted to start a bonfire with them, but decided this would be a better use. I cut open the legs, centered the side seams in the middle of the pattern, and lined it up on the bottom, using the hem already there. 
So now I don't have to hem my baby pants! Lazy!
Or Brilliant!
One of the two.
Anyway... whats makes these pants work is the elastic waistband and butt panel that makes it nice and roomy in there, but still small enough around the waist to keep the pants up:

I made mine a little long because I have this suspicion that he's about to have a growth spurt.
I also fiddled with the pattern to make them flat front... and I added a little detail: A fake fly and button. I totally ripped the button off the hated maternity pants too... but I think it's adorable on baby pants, don't you?

And even though baby boy looks a little startled to be in this picture, I think he likes his new pants. 

They were quite simple and only took me about 30 mins to whip up. Would have been less if I hadn't been trying to change things! I definitely recommend this pattern...
Think I'll go make a few more pairs...

Thursday, November 17, 2011

Changing Pad Cover

Here is another project from Baby P's room.
If you remember from Baby P's Furniture post, we decided to use what we had, as opposed to buying new furniture for the room. So we will be using the dresser as a changing table. We just had to get a pad for the top, and it actually works out pretty great because there is plenty of space in drawers below to hold diapering essentials.
(find out more after the jump!)

Thursday, November 10, 2011

Curtain-y Goodness!

You didn't think it was going to happen, did you? You were trying hard to believe my claims that there were actually curtains made... but the lack of blogged evidence made you doubt, didn't it? Well, guess what... the long-awaited curtains post is here!
This curtain project started a looooooong time ago. It was one of the first projects I tackled, actually. It just hit a big delay.
When I started my nursery project I discussed budget and inspiration here. I knew I wanted BIG panel curtains, but I knew I needed to get them for CHEAP. And that wasn't going to be easy. Erin and I went to a fabric outlet store in hopes of finding something fabulous and cheap... and we actually found several options, though I am indecisive and left empty handed. We found this lovely, bold, geometric pattern in black and white-- and I loved it. It was 8.99/yd which is pretty darn reasonable for the heavy interior (possible upholstery weight?) fabric that it was... but I was needing 6.5 yds for my drapes... and that would put me at around $60 in fabric... which isn't extravagant, but I was hoping to keep it under $50. There was another fabric that I didn't know for sure if I LOVED... but it was much cheaper and had the perfect shade of green, but a deeper shade of blue than I wanted. And it was a very subtle 'texture' rather than bold print like i was envisioning...
But I went for it, because it was in pile marked-- get this-- $2/yd. It was worth the risk of not loving it in the room when they rolled over 7 yards of the stuff for fourteen bucks. I felt good about that purchase.
So I got it in the room, and guess what???
I didn't love it.
Sigh. I was frustrated with myself for not loving it... but it wasn't singing to my soul, and I needed a song.  After staring and sighing at that big roll of fabric for a few days I made the decision that since I only had $14 invested in these curtains I could go ahead and slap them together, then replace them at a later date when I did find something that made my heart sing.
So I went to Target (you know, God's store...) to buy some hardware. I opted for a brushed nickle (to match the hardware on the the dresser) rod and curtain clips. So I could make simple panels and clip them up without worrying about pockets or tabs or whatever. Walking through the aisles at target I passed the sheets and found some lovely green ones... the PERFECT shade of green, actually. And all of a sudden inspiration hit, and I had an idea that might make my unhappy curtains a bit more song-worthy.
Time to get started... I used this tutorial for making professional drapes and this tutorial explaining a blind hem stitch and this curtain post as inspiration for size and style and installation. Armed with all that info... I set out to make me some curtains.
My finished product was to be 90 inch panels, so to allow my self plenty of 'mistake' room and a large bottom hem... I cut two panels 100 inches each. Then I cut 2 pieces of the green fabric the width of the panel and 20" in length. I serged and ironed those green pieces well.

To attach my green... I measured 18 inches from the top of the panel and pinned down the green. right sides of fabric together.

Then I stitched the green down, flipped it up, ironed it well, and top stitched on the right side along that seam.
At the top of the panel, my green accent piece was now longer than my curtain panel. I ironed that hem under and sewed it down for a nice pretty finished hem. Yay.
And that created a green accent for the top of the panel curtains. Looks like this hung up:
To finish the curtains I used that newly learned blind hem skill to finish off all the edges...
(Super excited/proud of this new skill)
(You'll notice I decided not to line these curtains. The fabric was already a heavy weight and we do have blinds on the windows to block light and make it nice and dark in there... so I didn't think it would need extra light blocking power... plus... I am on a budget here, remember? I was too cheap to spend extra money on lining. Don't judge me.)
And from here... we sat for about a month while I tried to convince the husband to fix the curtain rod. It wasn't anchored correctly when we first put it in, and the weight of just one of the panels as I was trying to hang it pulled it out of the drywall. Oops. So he finally got some heavy duty drywall anchors and got that puppy SOLID. Seriously, I could trapeze from that curtain rod now.
I put a nice deep hem in the bottom (about 5 inches...) and they were ready to be hung!
I already had this info on my radar, but recently found this picture which is an excellent visual illustration about hanging curtains:

High and wide! It plays tricks on your mind and makes your window look bigger and grander. (Grander? Is that a word???) Which we definitely needed with this puny thing in our baby room:
But with the curtains up, the same window looks bigger and more balanced on that wall...

 (I know what you are thinking... I could have gone higher/wider, huh?)
But the curtains are officially up, and guess what?
I LOVE them now.
They make my heart sing that happy tune I was hoping for. They are not punch you in the face statement curtains... but simple and nice and just the right ease for the room. I am happy. And happy one more project is complete. Yay.