What are you trying to find???

Showing posts with label tutorial. Show all posts

Wednesday, May 1, 2013

Recipe Keepsakes

Here's a project a created a few months ago for my dad... but I think it's a lovely and totally charming keepsake that would make a great Mother's Day gift (you have 12 days, by the way...) so I am sharing it with you now.
I actually started this back in December, because it was meant to be a Christmas present, but didn't quite happen.
I think every family has a few recipes that are unique to them... or unique to a certian person in their family. My Dad makes famous cinnamon rolls and a killer apple pie. No one can do it quite like him-- his recipe is unique and delicious and just... his. Same thing with my Grandma's cream puffs. No one made cream puffs like grandma. It was one of her specials. I got thinking about these special recipes and how I would love to make some recipe art for my kitchen, and how much my parents would love having some keepsake recipe art in their kitchen.
I did a little searching and drew some inspiration from HERE (which if you weren't set on creating your own, I would totally recommend, because the work in this shop is adorable), and HERE and set out to create my own. 
I created this using Adobe Photoshop Elements, and using the help of the following tutorials from How to Nest for Less, Sweet C's Designs, and Nest of Posies. If you don't have photoshop, here is a great tutorial about how to create printables using a free site like Picmonkey, it's from I am Momma, Hear me Roar.
After creating my recipe printable (which took a lot of time, trial and error, and tweaking. Self-taught/blog taught graphic artist here!) I looked into buying some nice frames to gift them... but frames are stupid expensive, and still didn't create exactly the look I wanted. So I decided I wanted to mount mine on wood for a little different style.
Here's how that went down:
I took my files to FedEx Office and had them make some nice color prints for me. This cost less than a dollar. (you might also notice that I changed my chalkboard to green... it matched the decor in my parent's kitchen a little better that way)
I went to Home Depot and had two boards cut to 8x10". Then I brought them home and sanded all the edges really well, and stained them with some stain I already had on hand. I also picked up some picture hangers while I was there. Cost for the boards, cuts, and picture hanging hardware was around $5. These were stained several days before... and had completely dried and cured by the time I was working with them. (You notice I didn't entirely stain that top side? It's going to be covered, doesn't matter.)
Next I trimmed the paper prints down to size, I wanted just a very small border of the wood showing around the edges. I laid it on top to make sure it fit and I was happy... I'm happy! Lets move on...
I used a paint brush to put a very very thin layer of Mod Podge (which I already had on hand) on the board, then centered the best I could, starting at the top, applied my paper as smoothly as possible.
I worked in small sections, but very quickly and carefully, as the stuff dries pretty fast and you really only get one shot to get it right. That makes it sound super complicated-- it's not. Just be careful.
Once it is carefully centered and in place with all the mod podge underneath... use a credit card (or your HyVee fuel saver card!) to carefully carefully smooth out bumps, bubbles, and wrinkles.
Once everything is all smoothed out and adheared, get out your modpodge and brush once more and put a thin coat accross the entire top of the board. Mod podge will dry clear, so don't stress if it obscures your artwork while it's still wet. Also, it will give a bit of texture to the art, so make sure your brush strokes all go the same way, and that you don't have finger prints or something in the mod podge... unless thats the look you are going for, I guess.
I will appear to be dry within like 15 minutes... but resist the urge to touch it for a few hours. Let it sit overnight undisturbed to fully cure and harden up.
The next day, install the picture frame hanger hardware stuff to the back (didn't take a pic of this part... sorry!) And you are all done! Yay!

You have lovely keepsake recipe plaques to display in your kitchen or give to someone you love-- or even to remember someone you love. I thought they were really lovely, unique, sentimental kind of art. This project cost me around $6 to create-- which is a pretty cheap gift, I think, but still packs a sentimental punch. If you didn't have things like the stain and mod podge on hand, you might be invested more like $15, but even still-- not bad for nice artwork gift.
I loved them on my kitchen shelf next to Grandma's teapot, and I love them hanging as a pair in my parent's kitchen. My parents were delighted with the gift and proudly hung them immediately.
Maybe you have some family recipes you'd love to create a keepsake out of? Maybe thie would be the perfect gift for your Mother or Grandma this mother's day? Or maybe you just came here to steal the prominately displayed secret apple pie recipe of my father's? Well, I cannot blame you if you did, it's icredible. I can only caution you now that you have this powerful secret to use your powers for good, my friend, not evil.

Thursday, March 10, 2011

Little Boy Bow Ties: Part 2

Yay! More bow ties! I tell you, friends, these things just make me happy! So in Little Boy Bow Ties: Part 1 I showed you how to make the bow part, and promised we would discuss the tie part later. Well it's later. Aren't we excited?
There are several ways you can make the neck strap for your bow-tie. Today I am going to show you how to make an adjustable strap using bow tie hardware. The hardware is not really easy to find. I searched my fabric stores and came up empty... searched online and didn't find much, but I finally found what i was looking for HERE, and I thought it was pretty reasonably priced. Shipping was fast and I am pleased with the product... so there you go!
Anyway, if your fabric store is better than mine or you happen to get your hands on some bow tie hardware, this is my fav method. easy on and off and adjustable for a good fit. Each hardware set has three pieces, a hook and eye, and a slide. You'll see how it works...

The hardware I have allows a 3/4" width for you fabric band. So I cut a piece of fabric 15x2.5 inches
(don't be like me, trim your selvage, please.)
Fold it in half length wise, right side together and sew (.5 inch seam allowance)

(again... don't be like me. Measure, pin, all that stuff my mom taught me how to do that I ignore forget sometimes.)
I like to iron my seam open before turning it right side out.
Turn your long skinny tube right side out (I used a safety pin attached to one side, fed through the tube, and then pulled out the other side) Press.

I didn't put my seam right on the edge... though I would recommend right on the edge, or in the middle. This will be on the back side of the band... it probably doesn't matter, do what you like!
At this point your bow is made... but you haven't tacked down the center of the bow tie... so you can just feed this piece through the back.
Don't tack that in place yet! Okay... get your little hook...
You'll want to fold that raw edge under and... (um, please ignore my lovely crunchy dry cuticles.)
Sew in place. Your sewing machine may be lazy like me! like mine is, and yell at you about sewing through that many layers of fabric, but you can tell it to suck it up and do it's job. That's what I told mine, at least. I kinda almost helped. Next you are going to put the slide on the other end... (see the arrow?)
(note that we are looking at the back side of that strap, and you can see 1 bar of the slide. On the front side you can see two of the bars) And then load the 'eye' piece on after that.
And then you will loop the strap around and go under the one bar of the slide a second time. (not really difficult to do, just difficult to photograph...) See the arrow pointing to the slide?
That short piece sticking up you are going to tuck the raw edge under and then sew it down... (again, awkward to photograph.)
Do you see the slide in there still? Note that you are just sewing the loop to itself, not through the rest of the band... you should be able to more the slide along the band to adjust the band size when you are done.
And then... you tack the bow to the band (a little off center closer to the hook side so you have plenty of adjusting room.) and...
Admire your lovely finished product: A fully adjustable, fully adorable bow tie for your favorite little man. YAY!
They are just so fun. Oh... and... try not to squeal out loud when you realize that cute black and white print bow tie is... what is that print??? Is that text? What th--
It's totally a MOO bow tie. Fabric remnant compliments of my MIL. I die. Serious cuteness and hilarity and genius all going on here in one tie. LOVE.
Anywho... hope you will give this bow tie method a try, it makes for a very nice, professional look. Let me know how yours turns out! :)

Sunday, February 27, 2011

Little Boy Bow Tie

I don't have kids. I might some day. When I do, there are two things I desire more than anything else in my children. One I have little control over one (please please PLEASE Lord, I really want red-heads!) and the other I have quite a bit of control over (at least for the first couple years of their lives...) and this one is a desire for my children to be handsome and well-dressed. I'm thinking nothing but bow ties and sweater vests. Oh, and suspenders. And blazers with little patches on the elbows. But most definitely bow ties. Every day. They can wear jimjams to sleep in-- but if not sleeping-- bow ties. I'm serious.
I love little tiny boys dressed as little tiny men. LOVE it. There are so many ridiculously cute ways to wear a bow tie-- we just need more of them in our lives, my friends! I'm bringing it back, hardcore!
Anyway. My fav little boy, Dawson, turned two, and had a shocking lack of bow ties in his wardrobe. That had to be remedied.
So here's what we did to fix that:

I started with a scrap of fabric... I really loved these multi-colored stripes, but I wanted the stripes on the Bias, which of course uses up a larger portion of fabric. I had to do some piecing together to make it work, but I was able to hide all seams. (You can see I am using the quilter's square my Granny gave me-- that thing is invaluable, even when i am not quilting! Thanks Granny!)

 I cut two strips 15 inches by 3.5 inches. Pin right sides together and sew all four sides with a straight stitch. Leave a two inch opening on one of the long sides to turn it.


Clip corners and turn right side out. Iron... and hand stitch that 2" opening closed.


You know have a long skinny rectangle, fold it in thirds accordion style, as shown below. Cut a strip of fabric 5 inches by 2 inches. Fold right sides together lengthwise, and sew along the long side of that... and iron flat. Then fold in half again and sew a seam 1 inch from the fold (pictured below-- sorry for limited picturage of these last few steps, I wasn't thinking...?) I trimmed off the excess... then turned that inside out again.

 Now fold up the (already folded) bowtie and feed it through the small loop you just made...
 VIOLA! Okay, I added a strap to it... you can add a strap that secures with Velcro, slides, or a bow tie clip. We'll discuss these options at a later date. (the one pictured has a strap that secures with Velcro-- just in case you cared)

Cute, no? It looked super cute on my friend Dawson. I think there will be more bow ties in our future... Yes?

(Hey... it's a BOY project. Have you guys seen Celebrate the Boy on MADE? It's an inspiring an much-needed series of all handmade 'boy stuff'. Check it out! )

CHECK OUT Little Boy Bow Ties: Part 2 for a tutorial on an adjustable strap!

Monday, January 31, 2011

Drapey Cardigan

I've been meaning to post this for a while... oops.
A few months ago I made myself this sweater. My mom thought it was adorable and asked me to make her one as well. I debated... do I want matching sweaters with my mom? Well, her requests were persistant and Christmas was approaching so I bought some soft fuzzy knit material in a pretty green color...
I have seen these draped cardigans lots of places... and figured... um, I can so do that. I looked for a pattern or tutorial online... but all I could find was this which was actually helpful, but i wanted sleeves. Soooo... here is my tutorial for a draped cardigan. It's really pretty darn simple and requires minimal sewing skills. Yay.
Here we go.

You are going to need:
Approx a yard of knit fabric
A sweater that fits you well for a pattern
Measuring tape
Pins
Coordinating thread
And... a sewing machine

 Start by measuring the sweater that fits you... Measure your sweater between the arms, across  the back. Also measure the sleeve from the shoulder to the arm pit.
 My fabric was 60 inches wide. I folded the width in half (the upper edge in the picture is a fold) and then cut the length at 30 inches. My arm to arm measurement was 14 inches, so I measure 7 inches from the fold (center) of the fabric and cut a slit through both layers that was 8 inches long (which was the measurement of shoulder to pit on my other sweater) This slit is about 4 inches from the top (right edge in picture) of the garment.
 Next I used my other sweater as a pattern to cut our the sleeve shape. (the sleeve on this sweater has a bell sleeve... but my cardigan will not.) I did cut my sleeves to be 3/4 length, because I like that cut on me, measure your arm if you need to, and make sure to leave a seam allowance when you cut out your sleeve piece. (again in this picture the top edge of the fabric is a fold--don't cut that!) (please also note... you will need to cut two sleeves, and make sure they are opposite/mirrors of each other)
 You don't have to if you are working with a knit... but i decided to put a hem on the sleeves. I turned up an inch on the bottom of my sleeve, and... finally busted out the sewing machine and sewed a straight seam across the bottom to create that hem.
 Once the sleeve was hemmed I folded it in half (right sides together) and sew along the side seam. (see the diagonal part along the right side of the pic? Don't sew that yet... okay?)
 Nooooooww... take the top corner of the sleeve (the longest point on that diagonal) and pin that to the top of the slit you made in the other piece of the fabric. Pin all around the sleeve, pinning right sides together all the way around...
 Then sew all the way around the top of the sleeve to attach it to the garment.
 Repeat for the other sleeve... and you are done!
I really like this sweater because you can wear it in different ways... just as a hanging drapey cardigan.

Or pin it across as a wrap sweater.
 Or... my favorite-- pinned up on one shoulder... so chic. :)

So there you go-- super easy, right? My mom was pretty excited about hers. But I don't have any pictures of her modeling it. It really looks much nicer on a person rather than a dress form... but you get the idea. Cozy, comfy, warm, wrapable, drapey cardigan... go make one!

Tuesday, January 18, 2011

FELT FOOD

I shared in THIS POST that I was trying my hand at some felt food creations. My friend's son received a play kitchen for Christmas, and I just had to be a part of the fun. I actually should have taken a picture of all the food iI gave him... don't know why that didn't occur to me before I did, but whatever. It was a cute, fun gift, and I used mostly scraps to create it, so it was cheap and stash-busting as well. Yay.
I made for him two cookies, an egg, a stack of pancakes, two strips of bacon, a carrot, broccoli, an orange two strawberries, and... an apple.
I'll show you how i did it-- but I must admit my first attempt or two turned out rather lumpy fruit. They got prettier, though.

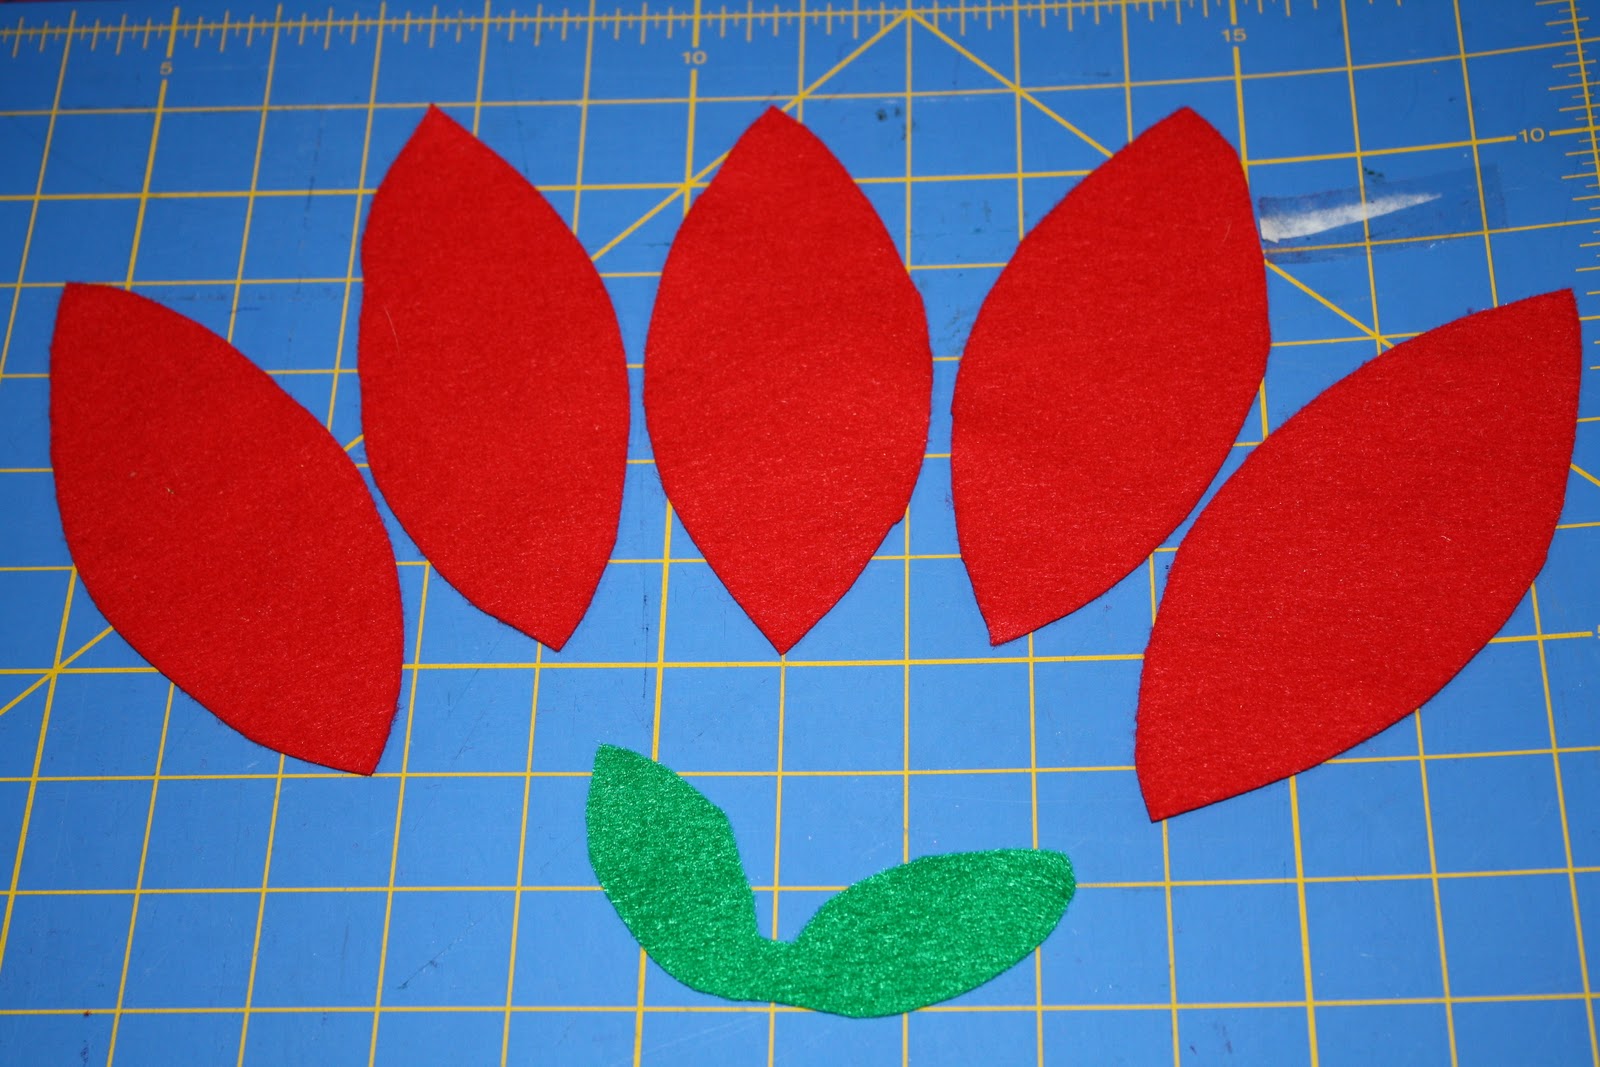
To make round fruit you start with 5 football shaped sections. my sections were about 6 inches long and 2.5 inches across at the widest point.
Start by pinning edges together (right sides together) and sew along one side.
with wrong sides still together pin another football to the un-sewn side of the first pieces you sewed together. (make sense?) Continue adding sections untill you have attached all five pieces, you will want to leave the the last section open about half way
because now you are going to turn it right side out. And stuff it.
And sew that thing up!
When you get to the end, insert your needle straight into the end and pull it all the way through and out the opposite end. I pulled it a little extra tight so the ends pucker in a little. The fold th leaf piece in half and attach it along with a scrap of brown to create a stem... and...
There you have it! Not real hard, but super cute.
Shoot. Now I want to make more. :)
Let me know if you try it... or if you have made any felt food? I just love the stuff... too cute.