What are you trying to find???

Tuesday, February 1, 2011

Paper Crafter

My friend Erin is super crafty and really into scrapbooking and cardmaking and all those paper crafts that have terrified me for years. Paper crafting-- I don't know what it is about it, I am just not patient or skilled enough to complete a project. So I don't. Erin laughs at me each time I express my fear of paper crafting.
Reeeewind about a month to Christmas. Santa was extra nice to me. He put a Silhouette under my tree. Yay fun. I was expressing to my friends once again that I was not a paper crafter and Erin said-- well you've got a silhouette now, so you are about to be. 
And I have to be honest with you, while I was BEYOND tickled about my new crafty gadget... it sat untouched for about four weeks, because I was still pretty intimidated by it. And you know... there's that paper thing...
Anyway. I finally busted it out about a week or so ago, and OMG I will never go back. I have barely scratched the surface of what this thing can do, and I am so loving it. Yay.

The first thing I made was a Happy Birthday cupcake topper for my niece. Not really ambitious or exciting, but it turned out cute and I was happy. (didn't take a picture...)
Z was impressed and asked me if I would make him a bookmark. I was like yeah, sure... and put it at the end of my to do list. Then he asked about four more times that same day, so I relented, and designed him a bookmark. 

(I had to put the thing together with fabric glue because I had no regular glue... Not a paper crafter, remember???) He was very impressed. We went to the store to get appropriate glue. As I type this he is requesting 2 more bookmarks. Husbands are silly.

At the beginning of the year there was this little thing going around on facebook where people who responded to a status post would get a handmade gift in 2011... and I decided to play along. My gifts are done, and I was trying to decide how to wrap them and I thought of those little pillow box things... and wouldn't you know... My Silhouette can make one of those. Easy peasy. 
But it couldn't be easy peasy, could it? It needed to be pretty and personalized... and well...
It needed to have intricate paper flowers on it. 
I did have a lot of fun designing and putting these flowers together after my spiffy machine cut them all out. All these shapes are ones that come with the software already, so that's pretty awesome too!
And I figured out how to weld all my text together so I could easily personalize them without a million tiny pieces to glue down.
And they are just colorful and make me happy. Oh, and if you happen to be someone owed a gift, and you see your name on one of these boxes... well, your gift is ready! 

Monday, January 31, 2011

Drapey Cardigan

I've been meaning to post this for a while... oops.
A few months ago I made myself this sweater. My mom thought it was adorable and asked me to make her one as well. I debated... do I want matching sweaters with my mom? Well, her requests were persistant and Christmas was approaching so I bought some soft fuzzy knit material in a pretty green color...
I have seen these draped cardigans lots of places... and figured... um, I can so do that. I looked for a pattern or tutorial online... but all I could find was this which was actually helpful, but i wanted sleeves. Soooo... here is my tutorial for a draped cardigan. It's really pretty darn simple and requires minimal sewing skills. Yay.
Here we go.

You are going to need:
Approx a yard of knit fabric
A sweater that fits you well for a pattern
Measuring tape
Pins
Coordinating thread
And... a sewing machine

 Start by measuring the sweater that fits you... Measure your sweater between the arms, across  the back. Also measure the sleeve from the shoulder to the arm pit.
 My fabric was 60 inches wide. I folded the width in half (the upper edge in the picture is a fold) and then cut the length at 30 inches. My arm to arm measurement was 14 inches, so I measure 7 inches from the fold (center) of the fabric and cut a slit through both layers that was 8 inches long (which was the measurement of shoulder to pit on my other sweater) This slit is about 4 inches from the top (right edge in picture) of the garment.
 Next I used my other sweater as a pattern to cut our the sleeve shape. (the sleeve on this sweater has a bell sleeve... but my cardigan will not.) I did cut my sleeves to be 3/4 length, because I like that cut on me, measure your arm if you need to, and make sure to leave a seam allowance when you cut out your sleeve piece. (again in this picture the top edge of the fabric is a fold--don't cut that!) (please also note... you will need to cut two sleeves, and make sure they are opposite/mirrors of each other)
 You don't have to if you are working with a knit... but i decided to put a hem on the sleeves. I turned up an inch on the bottom of my sleeve, and... finally busted out the sewing machine and sewed a straight seam across the bottom to create that hem.
 Once the sleeve was hemmed I folded it in half (right sides together) and sew along the side seam. (see the diagonal part along the right side of the pic? Don't sew that yet... okay?)
 Nooooooww... take the top corner of the sleeve (the longest point on that diagonal) and pin that to the top of the slit you made in the other piece of the fabric. Pin all around the sleeve, pinning right sides together all the way around...
 Then sew all the way around the top of the sleeve to attach it to the garment.
 Repeat for the other sleeve... and you are done!
I really like this sweater because you can wear it in different ways... just as a hanging drapey cardigan.

Or pin it across as a wrap sweater.
 Or... my favorite-- pinned up on one shoulder... so chic. :)

So there you go-- super easy, right? My mom was pretty excited about hers. But I don't have any pictures of her modeling it. It really looks much nicer on a person rather than a dress form... but you get the idea. Cozy, comfy, warm, wrapable, drapey cardigan... go make one!

Tuesday, January 18, 2011

FELT FOOD

I shared in THIS POST that I was trying my hand at some felt food creations. My friend's son received a play kitchen for Christmas, and I just had to be a part of the fun. I actually should have taken a picture of all the food iI gave him... don't know why that didn't occur to me before I did, but whatever. It was a cute, fun gift, and I used mostly scraps to create it, so it was cheap and stash-busting as well. Yay.
I made for him two cookies, an egg, a stack of pancakes, two strips of bacon, a carrot, broccoli, an orange two strawberries, and... an apple.
I'll show you how i did it-- but I must admit my first attempt or two turned out rather lumpy fruit. They got prettier, though.

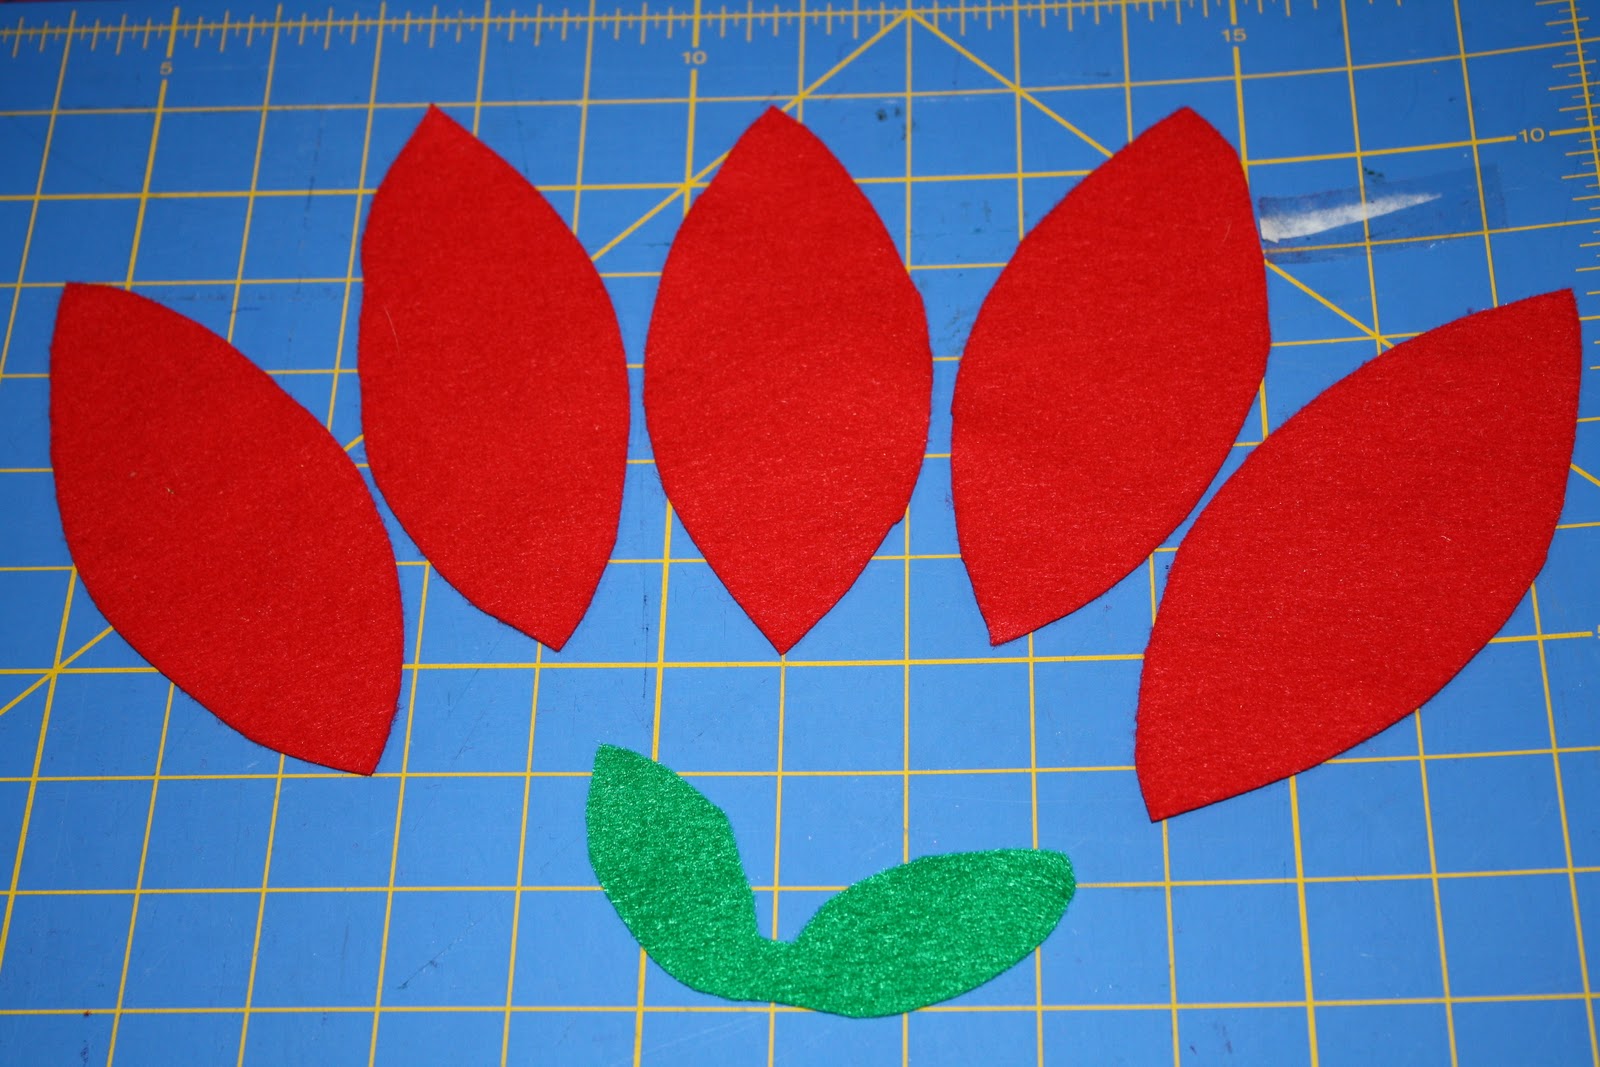
To make round fruit you start with 5 football shaped sections. my sections were about 6 inches long and 2.5 inches across at the widest point.
Start by pinning edges together (right sides together) and sew along one side.
with wrong sides still together pin another football to the un-sewn side of the first pieces you sewed together. (make sense?) Continue adding sections untill you have attached all five pieces, you will want to leave the the last section open about half way
because now you are going to turn it right side out. And stuff it.
And sew that thing up!
When you get to the end, insert your needle straight into the end and pull it all the way through and out the opposite end. I pulled it a little extra tight so the ends pucker in a little. The fold th leaf piece in half and attach it along with a scrap of brown to create a stem... and...
There you have it! Not real hard, but super cute.
Shoot. Now I want to make more. :)
Let me know if you try it... or if you have made any felt food? I just love the stuff... too cute.

Saturday, January 15, 2011

I'm Back!

So I have taken a vacation from blogging for a couple of weeks, and I took a vacation from everything this week. And... now that i am feeling a little less stressed and a little bit more comfortable with my ever changing (hopefully for the better?) life... I'm back! With some things I've made... some new skills I'm learning... some fun new adventures I'm trying... and some teasers about what I'm doing for the next couple months. Hopefully I'll be back in the game and blogging more frequently over the next couple months. :) I'm looking forward to sharing with you.

Monday, January 10, 2011

The Wedding of my Dreams

7.5 months after the big day I have my first wedding day nightmare.
I didn't have any wedding nightmares when I was planning the wedding-- I was surprisingly chill. But last night I had a dream in which I was a bridezilla of unimaginable proportions. And nothing was right. NOTHING.
It was snowing. I had selected a lovely spring day to get married and in came a raging storm like none other. With mud and slush and cold and the whole church was a soggy mess from it.

My carefully altered gown was too big and hung unattractively off my shoulders... I was trying to get ready and my mom was trying to put safety pins in my shoulders to hold my dress on.
The bridesmaids revolted, and instead of the lovely, simple, flattering black dresses I had selected for them to wear-- with the handmade veils and headpieces I created-- they wanted to wear blue. But not all the girls could get a blue dress in their size, so one just showed up in her sweats, shrugging, saying it was the only blue thing she owned, and it's not a big deal, because all I really wanted was her presence anyway... right?
Well, yes, of course. But...

We were on our way to the church... and I couldn't find my bouquet. I knew it had been delivered, and I was so excited to see the yummy rich roses and gold accents I had carefully selected... but I couldn't find it anywhere, I walked out onto my parent's back deck and I found a gorgeous $200 bridal bouquet in pieces... most of the pieces hanging out of the mouth of my parent's dog.
My mom took a brown silk flower out of an arrangement on the wall of her house and told me I should just use that. I was crying from disappointment, and wanting to kill the dog, and everyone was telling me I was being ridiculous, and the wedding was not that important anyhow, and why was I so upset?

We arrived at the church to meet the photographer and my groom... only to discover that neither had showed up. Apparently the groom had decided he didn't love me and he didn't want to get married that day.
His best friend had gone to talk some sense into him... but sense we were on a time crunch, and he hadn't yet changed his mind, they were going to have his brother (who was one of the groomsman) stand in as the groom for pictures... And one of the groomsmen's wife stand in as the extra groomsman. They got her a tuxedo t-shirt so she wouldn't stand out.


 Our photographer still had not arrived, but everyone was reprimanding me for my hysteria because I was going to look horrible in my pictures-- and this isn't the way I wanted to remember my day. And they were right! This was all wrong! I didn't want to remember my wedding day like this... I wanted everything to be right. I didn't want to be a bridezilla--
But as my dad was walking me down the aisle to be married I was crying because even though every other detail was wrong about the day... I would have gone through with it. But I was not looking at the man that I loved. He was not there, and I knew I shouldn't be either.

So there were no vows said that day.
There was no first kiss,

And no first dance.

And no happily ever after.

Everyone kept calling me bridezilla and scolding me for getting caught up on 'details' that don't matter. And I didn't understand why NO ONE thought NOT having a groom there was was anything more than an unimportant 'detail'. I was screaming at the top of my lungs at my bridesmaids, at my mom, at the whole church, at the dog that ate my flowers-- GROOMS ARE NOT DETAILS!!!! And everyone looked at me like I had completely lost my mind.

I woke up suddenly and miserably with my adrenaline pumping and a throat sore from screaming.
When I became conscious that I was actually in bed I was happy to discover that it was January. And snowing outside. My husband was asleep breathing softly in bed next to me. We were in fact married last May. It was a beautiful, perfect day. Every detail was in place. My groom was the most handsome charming man alive. And he loved me very much that day.
And... for all our hardship over the past few months I know-- I KNOW-- he loves me even more today. So after the worst wedding nightmare ever (7+ months after the fact), I am happy to report I did not have the wedding--or the groom--of my dreams.
Sigh of relief.

Saturday, December 25, 2010

Christmas

Comfort ye, comfort ye my people, saith your God. Speak ye comfortably to Jerusalem, and cry unto her, that her warfare is accomplished, that her Iniquity is pardoned. The voice of him that crieth in the wilderness; prepare ye the way of the Lord; make straight in the desert a highway for our God.
Ev'ry valley shall be exalted, and ev'ry mountain and hill made low; the crooked straight, and the rough places plain.
And the glory of the Lord shall be revealed, and all flesh shall see together; for the mouth of the Lord hath spoken it.
(Isaiah 40 : 1-5)

Thus saith the Lord, the Lord of Hosts; Yet once a little while and I will shake the heav'ns and the earth, the sea and the dry land: And I will shake all nations; and the desire of all nations shall come.
(Haggai 2 : 6-7)

The Lord, whom ye seek, shall suddenly come to His temple, even the messenger of the Covenant, whom ye delight in: behold, He shall come, saith the Lord of Hosts.
But who may abide the day of His coming, and who shall stand when He appeareth? For He is like a refiner's fire.
And He shall purify the sons of Levi, that they may offer unto the Lord an offering in righteousness.
(Malachi 3 :1-3)

Behold, a virgin shall conceive and bear a Son, and shall call his name Emmanuel, GOD WITH US.
(Isaiah 7 : 14; Matthew 1 : 23)

O thou that tellest good tidings to Zion, get thee up into the high mountain. O thou that tellest good tidings to Jerusalem, lift up thy voice with strength; lift it up, be not afraid; say unto the cities of Judah, behold your God! O thou that tellest good tidings to Zion, Arise, shine, for thy Light is come, and the glory of the Lord is risen upon thee.
(Isaiah 40 : 9; Isaiah 60 : 1)

For behold, darkness shall cover the earth, and gross darkness the people; but the Lord shall arise upon thee, and His glory shall be seen upon thee. And the Gentiles shall come to thy light, and kings to the brightness of thy rising.
(Isaiah 60 : 2-3)

The people that walked in darkness have seen a great light; and they that dwell in the land of the shadow of death, upon them hath the light shined.
(Isaiah 9 : 2)

For unto us a Child is born, unto us a Son is given, and the government shall be upon His shoulder; and His name shall be called Wonderful, Counsellor, the Mighty God, the Everlasting Father, the Prince of Peace.
(Isaiah 9 : 6)

There were shepherds abiding in the field, keeping watch over their flocks by night.
And lo, the angel of the Lord came upon them, and the glory of the Lord shone round about them, and they were sore afraid.
And the angel said unto them: Fear not, for behold, I bring you good tidings of great joy, which shall be to all people. For unto you is born this day in the city of David a Saviour, which is Christ the Lord.
And suddenly there was with the angel, a multitude of the heavenly host, praising God, and saying:
Glory to God in the highest, and peace on earth, good will towards men.

(Luke 2 : 8-14)

Merry Christmas!

Wednesday, December 22, 2010

MAKE THIS: Last Minute Gift Idea-- Zipper Bows

Spent my evening working on some last minute projects before Christmas. I am sure you have seen zipper flowers, bows, and details on all kinds of clothes the past couple seasons. These little zipper flowers are super easy to make and a cute embellishment for your clothes, hair, bag, dog... whatever in your life you feel needs some extra pizazz!

I used THIS video tutorial to learn how to make them. I had tried them a couple times before watching the video... and it was not working out. I watched the video and I went... OHHH! I was doing it backwards all along... and THAT is why they were all wonky. Anywho... I know now.

My mom was the one who suggested the little gemstones in middle... which I think is cute. (I used be-jeweled brads that i bought in the scrapbook section of Hobby Lobby, but then was considering how many mis matched pairs of stud earrings I have that I should have used instead... oh well)

Add a pin or a headband or a hairclip to the back... and definitely attach it to the top of a package this Christmas. I am sure your recipient will be quite excited.
Merry Christmas, friends!